7 Pages are shown on the Main Page.

7 pages are shown on the Main Page. To see additional posts, click on the link "Older Posts" at the bottom of the main page. For videos go to https://www.youtube.com/@normanretzke4377/videos click "skip" to avoid ads


G has a "swell" time kayaking

G has a "swell" time kayaking
G has a "swell" time on Lake Michigan in an inflatable canoe

Dawn on the Gulf of Mexico

Dawn on the Gulf of Mexico

Warren Dunes Sunset

Warren Dunes Sunset
Warren Dunes Sunset

Sunday, August 1, 2021

A wooden cabinet from scraps


Project - Small exterior cooking cabinet on re-purposed removeable tube stand
Final step is to attach a front screen

Bookmark and Share

Using scrap wood to build a small exterior cabinet

In July 2020 I built a cook station - work table at the Summer Lily Pad. It was a CCP Covid-19 project. At the time I also wanted a small enclosure for storing cooking oil, seasonings and so on.  When I replaced the grill that came with the used travel trailer I had a nice exterior, removeable stand.  Hmmm, I said to myself "This presents an opportunity". So I set it aside.

I find these projects useful in several ways. They are design challenges; i.e. finding a solution to a specific problem. This allows me to exercise my creativity in small ways, it provides an exercise in anticipating problems encountered during the process, and it requires some manual dexterity and an opportunity to use tools. In other words, it uses both sides of the brain as well as my body. These projects all have a tangible deliverable and the outcome is what it is. 

One of the challenges with these projects is always to minimize costs.  That means having available a minimum of tools which can be applied to a very wide range of projects. G thinks I have a lot of tools, but in fact, I have only a necessary few. I know, that sounds subjective.  I compare my range of tools to a modern kitchen and I have far fewer in quantity than most of the gadgets and utensils of a kitchen. 

When doing a project I sometimes re-purpose bricks, bits of scrap wood and so on as "tools" and these are usually available anywhere. A few blocks and scraps can go a long way. Furthermore, I prefer to buy as little as possible. With limited space in the Roadtrek and at the summer lily pad, having what is needed available, not less and not more is sometimes a challenge.  Challenges are good, I say. 

Original Celano Grill on removeable stand

I really didn't want to spend any money on this project.  I saved some scrap 3/8 plywood left over from the construction of the cook station/work table.  I stored it in the underbelly of the travel trailer.   I sketched a design utilizing most of the scrap, maximizing the dimensions of the cabinet by the wood available. With these dimensions and a 24 x 12 inch square straight edge I marked up the scrap plywood. I checked the dimensions several times.  "Measure twice, cut once" is the expression. 

I had some 1-1/2 inch decking screws left over from the cook station project. I had two machine screws to replace the wingnut screws holding the existing tube frame together. I wanted the sides of the "box" to extend below the support tubes and prevent sliding sideways. I also had some gray Cabot solid wood stain and Gorilla glue. What I lacked was some wood to fasten and hold the sides, top, bottom and rear together.  If I didn't want a monochrome color, then I could use some of the Royal Blue Rust-oleum enamel for the outside. I also had gloss white and black. But I didn't want black as it would absorb heat and white would show dirt. I'd probably purchase a quart of gloss of the desired color. I decided upon gloss sand Rust-oleum enamel. I had vinyl screening for a front. The out-of-pocket costs were about $15.  

What I needed to do the build was some 1x2 and 1x1 lumber, and my sketches gave me the lengths of each of the individual pieces required. I knew exactly how many 6 ft or 8 ft long pieces to buy so as to cut and minimize waste.  However, with the high lumber prices in the Spring of 2021 I decided to wait for a lower priced opportunity. 

In late July, while walking past the Beach Bucket after getting an ice cream cone, I spotted a stack of wood scraps. Neatly bundled, each bundle was priced at $5.  I picked through the bundles and selected one; this would allow me to complete the assembly of the cabinet.  The scraps were intended to use as kindling for campfires. I'll use the leftovers that way.  I extracted choice, uniform pieces for my project. Even after taking out the pieces for construction I do have a lot of kindling:

Scrap wood for kindling

Tools used:
  • Clamping miter box - see photo
  • Two 20 inch sliding arm bar-clamps
  • Tape measure
  • 24 inch steel square
  • Pliers
  • Xacto style knife
  • Variable speed 3/8 drill and bits
  • Screw drivers
  • 1 inch foam brush
  • Paint can opener
  • 3 inch paint brush
  • pen.
  • Note: all screws were pre-drilled with a pilot hole.

Clamping Miter Box - similar to mine

I selected pieces approximate 1x1 inch and cut to the length required using an inexpensive plastic clamping miter box.  I did the cutting on the previously built cook station - work table.   I then clamped and glued these to the 3/8 plywood sides.  These will also attach the sides to the top and rear of the small cabinet.  I'll glue the rear of the cabinet sides to the sides, but screw the bottom and top to the sides.  I do this on a campsite picnic table, exercising care not to damage the table:

Positioned, clamped and glued 1x1 to a side - sliding arm bar clamp shown
I didn't use the corner clamp in the photo

Gorilla glue is water activated. I used a 1 inch foam brush as shown in the photo above to apply water from a paper cup to the surfaces to be glued.  I then drizzle a thin bead of glue on one of the surfaces.  Too much will squirt out under pressure; too little and a good joint does not occur. I then apply a clamp or two and let the glue set for 2 hours.  The glue reacts with water and excess flows out as can be seen in the photo below:
Pieces glued to the sides

I use a razor knife to remove any excess glue after it has set. The dry glue has a consistency like a spray foam. I can trim one piece while the other is clamped, glued and is setting.  It is important to remove any excess that might prevent two surfaces from achieving a tight fit when gluing.  I also remove some glue that might create a bad appearance.  After doing the first joint I knew how much glue to use and there was less excess to trim:
Using Ace Hardware version of Xacto (r) knife to remove excess glue
while another piece is clamped after gluing

I allowed the side pieces to set overnight and continued the project on the next day. The next step is to glue and clamp the first side to the rear of the cabinet. The brick in the photo provides stability and also a place to store a closed, inverted bottle of Gorilla glue. The glue is viscous and needs to be coaxed out of the bottle. Storing inverted expedites the gluing. I use scraps of 2x4 which I saved from the cook station project and 1x1 to provide a suitable clamp support:

First side clamped and glued to the rear of the cabinet

After the glue is completely set I then proceed with the second side. Note the "bow" in the first side, which is on the left. This is not unusual for thin plywood. I'll clamp and glue a frame to the front and the purpose will be to improve appearance, straighten the side, and provide a place to fasten a front screen:

Clamping and gluing the other side to the cabinet rear

When both sides are glued to the rear, I flip the assembly over and check the fit of the base, which is cut to the interior width.  Flipped, showing how the sides extend below the rear and bottom.  This is to prevent the cabinet from sliding off of the 3/8 inch diameter tubular rack that it will set upon:

Flipped, sides glued and with the rear on the top

Next step: attach bottom to cabinet using screws. Photo with rear glued to 1x1 side supports and bottom screwed to 1x1 side supports. I decided to screw the top and bottom so they could be replaceable if necessary. Ready for the top piece:

Bottom attached

The top was attached with four screws.  Note the overhang in all directions to prevent water from running into the edge of the plywood. The largest is on the front:

Basic box assembled

Set in place. Note the pitch of the roof from front to rear to shed water.  Ready for assembly of front frame, using approximate 1 x 2 inch scraps:

Set in place, ready for front frame assembly

Side view.  Note the 1 x 1 supports are cut to accept a front frame:


Side View prior to installing front frame

I assembled a front frame from four pieces of nominal 1 x 2 scraps. I glued the side pieces in place and screwed the top and bottom pieces into place. I purchased a quart of Rust-oleum sand gloss paint for the exterior and used Cabot gray solid wood stain for the interior.  The final step will be a front screen (I have some vinyl screening).  This to keep bugs and critters from  moving in.

Assembled and painted

The bottom piece of the frame was not a perfect 1 x 2.  I had to cut a slight recess to provide a flush front. You can see this was rough wood. Every piece I used had at least one smooth face. I always made sure a smooth face was used for gluing. To make this cut I used the saw from the miter box and did it by hand by clamping it to the cook station - work table. 

Recess cut to make the front frame flush


In this photo it can be seen how the sides of the box are longer and fit over the 3/8 tube support frame. This prevents the cabinet from sliding sideways and falling off the support frame.

Resting on the support tubing - now to add the screen and knob


Porcelain knob - from the nearby Ace Hardware

The screw that attaches the porcelain know was about 1/4 inch too long. I used my USA made "Four-Way Wire Crimper/Stripper Tool" to reduce the length of the screw. It includes several screw cutter dies.  I circled the area on the tool which has several of the dies.  It worked great!


Original Material: Roadtrek210.Blogspot.com (c) 2021


Tuesday, July 27, 2021

Roadtrek Propane Tank - Improper Fill Procedures


Level indicator on Propane Tank - 87% indicated - is it overfilled?
 How would we know?
 Is that important?
 

Bookmark and Share

Proper and improper filling of the Roadtrek propane tank

There are correct, proper fill procedures for propane tanks. And then, there are improper fill procedures. Improper filling, i.e. "overfilling" can result in a dangerous situation. By comparison, underfilling is merely an inconvenience. This post is about how to fill the onboard Roadtrek propane tank to the proper level.  It is also about that mechanical dial indicator on the propane tank, and the remote LED LPG indicator inside the Roadtrek.  Not all Roadtreks have a remote LED indicator. This is not a "do-it-yourself" post. This is about education and awareness for owners. Only those trained and certified should handle propane.  Sadly, not all attendants are competent to do so and I am writing from experience.  However, I have never had my propane tank overfilled. Attendants have underfilled the tank. I monitor all filling procedures. 

Improper fill procedures can result in a dangerous situation. Propane tanks should never be filled more than 80%. The indicator in the photo above implies that the propane tank is more than 80% full.  If this is so, it is a dangerous situation.  However, the indicator is not there to be used by the attendant to fill the tank. The indicator and a remote LED dot display are for the Roadtrek owner to provide general information about the amount of propane in the tank. It is possible that the mechanical indicator in the photo above is in error. 

This post provides information about the proper procedure to avoid overfilling the propane tank.  It is an informational post and is not a training aid or tutorial.  If one knows the tank has been properly filled that instills confidence. If one knows that the proper procedures have been followed then one also knows what the number on that mechanical dial indicator is representing when the tank has been properly filled to 80% level, and not more or less. 

Underfilled tanks is another improper procedure, but when that occurs it may be inconvenient and it may mean that  you will run out of propane earlier than expected. That too is undesirable, particularly if cold weather RVing. 

Why is more than 80% dangerous?

Why are propane tanks only filled to 80%? Propane in the tank is liquid, and that liquid expands as the tank temperature increases. Above the liquid in the tank is gaseous propane. Propane in a gaseous state is what is burned. The various burners in the Roadtrek appliances are designed for gaseous propane. If liquid propane gets into the piping of the Roadtrek it may get to the burner for the 3-way refrigerator, the furnace or the rangetop as a liquid. Liquid propane will expand rapidly when exposed to air pressure at the burners and it may burn violently. 

The 80% fill point is a cushion to assure that only gaseous propane gets into the propane lines to your appliances. 

There are ample warnings about this in the various Roadtrek manuals. If you don't have one, they are available at the official Roadtrek.com website. 

How does an attendant determine when to shut off the propane when filling the tank?

Obviously, it is important not to overfill the propane tank.  How does an attendant know when to stop filling the tank?

He/she/it does not or should not use the mechanical dial indicator. These indicators are unreliable.  The tank is equipped with a more reliable device. 

The propane tank is equipped with an "outage" valve. This is a small valve mounted on the tank at the 80% full level. It is to be used by the attendant when filling the tank.

Here's a diagram showing the location of an "outage" or bleed valve on a Manchester Tank Co. propane tank, similar to the one in my Roadtrek 210P: 

When an attendant is filling the tank, he/she/it should open the outage valve. It will hiss as the tank is filling with propane, as some gaseous propane escapes. When the liquid propane reaches the level of the outage valve it will "sputter" and some liquid propane will be discharged. This indicates the tank is full to the 80% level.

At this point the attendant should cease filling and close the outage valve. 

Outage valve on the propane tank of my 2013 210P Roadtrek
The outage valve on your Roadtrek may be different


When he/she/it has removed the propane fill valve, you can check the level on the tank indicator. For newer Roadtreks this sensor not only provides local indication, it also transmits this information to the LED display inside your Roadtrek. Here's the tank level gauge in my 2013 210P:


Propane level indicator with wiring for remote indicator
About 30% level indicated


2013 210P "LPG" Propane remote level indicator
LEDs indicate somewhere between 2/3 and 100% level


How to read the mechanical indicator? Is it reliable?
In the photos above you will see the dial indicators on two different propane tanks. They both have a mechanical pointer and one has electrical wiring for a remote indication.  But are they accurate?  That is, do they accurately represent the level of propane in the tank? Most importantly, when the tank is properly filled to 80% what level do they display?

In fact these indicators may not be accurate. It is possible to establish two points for the indicator. One is the display when the tank is at the 80% level and the other is the 0% level. If we have an attendant fill the propane tank to the 80% level using the proper procedure, we can then observe the displayed level on the tank indicator. If it shows "F - 80%" or "Full" that's great. We can also monitor that on the remote LED display on the Roadtrek panel.  If the mechanical display does not show "F" but displays some other value, i.e. "70%" we can mark that in the Roadtrek manual we carry with us as the actual "full" point, in other words, in this circumstance when 70% is displayed the tank level is actually 80%. Similarly, we can check the remote LED indicator inside the Roadtrek if so equipped to see what it displays.

Frankly, there may be inconsistencies.  However, my concern when trekking is 1) I want to avoid unsafe situations and 2) I don't want to run out of propane for hot water. The only energy source for hot water in my 210P is propane. I have electric options for everything else. I use the LED indicator as an "approximation" for the propane tank level.  

Propane Safety Label on my 2013 210P:


Original Material: Roadtrek210P.blogspot.com (c) 2021


Monday, July 26, 2021

Roadtrek Propane Tank and Bleed Valve


Tank Rust - February 3, 2017

Bookmark and Share

Preventative maintenance of the Propane Tank

In 2016 I slid under the Roadtrek and did an underside inspection,  I noticed some dings in the propane tanks, flaking of the enamel and some rust. When at the Southwestern Lily Pad  I cleaned the tank exterior, wire brushed the rusty areas and then brushed on a coat of Rust-Oleum white enamel.  The location of the tank is such that it can be struck by rocks and stuff kicked up while driving.

The paint stopped the rust and based upon a recent visual inspection it is in good condition, 5 years later.

Note: It is my understanding that the tank on my Roadtrek is double-walled. I've been a member of the FMCA Roadtrek International Chapter since 2013/2014 and a recent discussion about propane tanks included this comment by a member: “I toured the Roadtrek plant in Kitchener, Ontario a year ago last October. Our plant guide said the propane tank is double lined and any deterioration to the outside is cosmetic and the tank itself should never have to be replaced. "  I can't say that is accurate. Nevertheless, I think preventative maintenance of the exterior is worth it.

I recommend the Roadtrek Chapter and it purports to be "about one of the TOP THREE FMCA Chapters in membership."

Specifications, my 210P:

Roadtrek propane tank size: 10 gallons. 

Weight of 1 gallon of propane: 4.2 pounds

My tank 80% full = 33.6 pounds of propane.

For reference: a small "green" disposable bottle holds 1 pound of propane. 

Photos of Roadtrek tank, before and after cleaning and painting:

Cleaned and wire-brushed


After painting with Rust-Oleum white enamel


Condition of the propane tank -  July 26, 2021

Propane Tank Outage "Bleed" Valve

Some of the Roadtrek manuals include a propane system diagram and a diagram of the propane tank. The tank diagram identifies the location of the fill, shutoff, outage valve and tank level gauge.  If you don't have a manual go to the official Roadtrek website and download one.  They are in pdf format.  Hint: Roadtrek made substantial improvements to later manuals.  Check them on the website and you may find a lot of useful information. Roadtrek website:

Roadtrek owners manuals

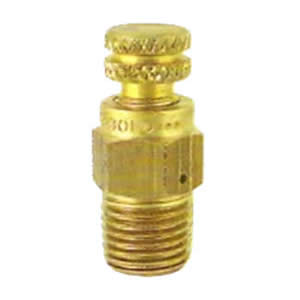
Here's a diagram of an RV style tank made by Manchester Tank Co. It is marked to show the "outage valve".  Next is a photo of one style of outage valve made by Manchester tank, and the third is a photo of the tank on my 2013 210P. This was taken with the rear access cover removed.  The arrow points to the "outage" valve. This valve is to be opened by the attendant when filling the tank.  When the tank level reaches 80% liquid will come out of the hole in the center, signifying a full tank.  In my experience, not all attendants do this and so at times the tank is not properly filled.  Usually the tank is underfilled because the attendant shuts off the propane fill at an arbitrary number of gallons.  I prefer to avoid gas stations because the attendants have been trained to fill propane bottles, and are not familiar with on-board propane tanks:


Manchester Tank Co - Illustration of propane tank showing location of outage valve
This is not a Roadtrek propane tank! 


One style of "Outage" or "Bleed Valve" -  Manchester Tank Co .

2013 Roadtrek 210P Propane Tank Bleed Valve - also called an "outage" valve


Main Propane Tank Valve & Components:


1 = Coach Propane Shutoff Valve
2 = Propane Fill Connection
3 = "Outage" valve
4 = Propane fill indicator and sensor for remote indication
Note: I removed the BBQ 10 PSI regulator & hose on my 210P.


Safety Labels on Propane Cover:
Roadtrek had specific safety guidelines.  This is the label on my 2013 210P:


Original Material: Roadtrek210.blogspot.com (c) 2021


Sunday, July 25, 2021

Walking up the Dune at Warren State Park


Walking toward the dunes at Warren Dunes State Park - 9:30am

Bookmark and Share

Last night we had a steady, heavy rain for a couple of  hours.  With breezes from the southwest we knew the smoke, soot and haze from the western fires including those in Manitoba CA would be blown out of the area.  Furthermore, the rain packs the sand, making the uphill walk easier. So, the next morning after a light breakfast we took a walk and climbed the largest dune near the beach. The walk into the park and up and down is a couple of miles in total. Sometimes we bicycle, but with the summer peak on a weekend, walking off the road is much safer. Not everyone observes the 20 MPH speed limit, nor does everyone drive expecting to encounter a slower moving bicycle on the curves that lead to the beach.  

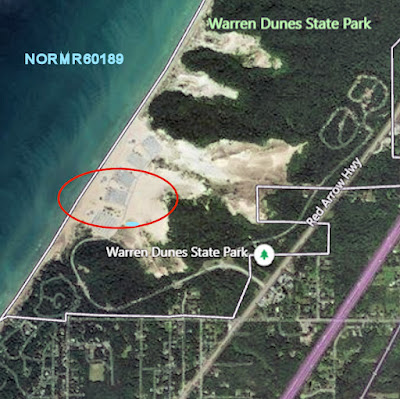
Here's an aerial view of the Warren Dunes State Park, MI.  Courtesy of Bing Maps. The ellipse is the area we were walking in this morning:

Warren Dunes State Park - Source: Bing Maps - area in the photos

We always walk with shoes, or hiking boots. We've encountered rusty cans buried in the sand, bottle tops and of course, there is a lot of wood from long dead trees.  On this walk, we encountered a couple of barefoot teenagers on the dune.  One complained of a cut "from a piece of wood".  She was able to walk down and deal with it at the bottom.  We also carry water. Hydration is important.  It is surprising how many we encounter with no water.  Taking care of the children - NOT!

G zig-zagging up the dune

It is smart to zig-zag to the top to control the heart rate. I push a bit more than G, so I tend to go straight up, if conditions permit. Hard packed sand is easier to walk on, too. Our goal is to enjoy our companionship, get a nice workout, enjoy the breezes and views, avoid the crowd and have a good time.  On some trails there are switch-backs. On the dunes we create our own to the top and hike within our comfortable limits. 

Rain stippled and compacted sand - easier walking uphill


G nears the top, I'm facing south

Steep approach to the top


Looking back as I near the top - more level walking


Some shade near the top - 9:46am


G takes a break and enjoys the view

A pleasant view from the top

One of the rewards of this hike is the wonderful, cool breezes which are generally off of Lake Michigan.  The water temperature near shore is somewhere between 65F and 70F on any given day. That is a cooling influence. Another reward is the view in all directions.  At the top, there is even some shade. 


Near the crest of the dune, it levels and walking becomes easier

After enjoying the view and the breezes, we walk down and

Beach at 10:15am

toss skipping stones into the lake. The beach people are arriving in a steady stream.

It will be a fun filled crowd today, which is our cue to leave. So we hike out of the park and return to our site.


Original Material: Roadtrek210.blogspot.com