This is our Trek in our Roadtrek 210P. Hint: Scroll to a list of "Topics and Destinations" on the right. Our RT is a portal to a much larger world and we have established "lily pads" from which we travel and we'll post about those, too. Life is a Journey of discovery in our Motorized Alpaca, a "tiny cabins on wheels". It has been said that "Life Begins at the end of our Comfort Zone." Content and photos are original unless noted. Click photos to enlarge.
Copyright and disclaimers apply.
7 Pages are shown on the Main Page.
7 pages are shown on the Main Page. To see additional posts, click on the link "Older Posts" at the bottom of the main page. For videos go to https://www.youtube.com/@normanretzke4377/videos click "skip" to avoid ads
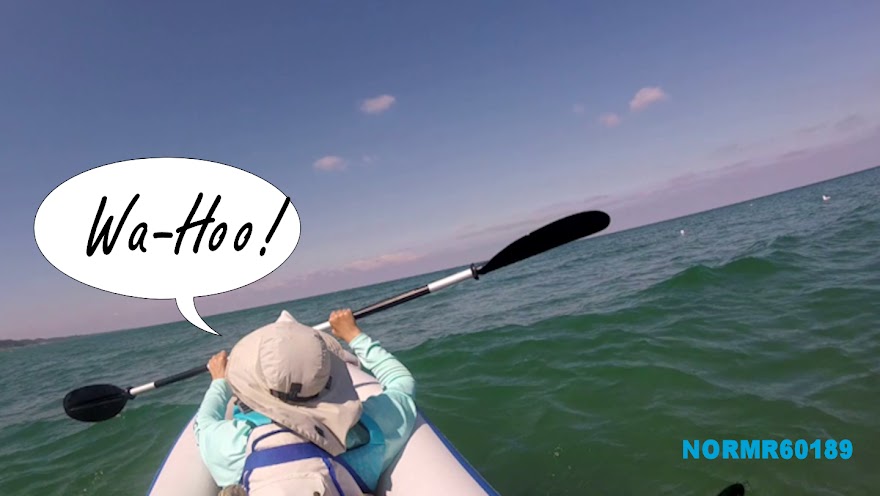
G has a "swell" time kayaking
G has a "swell" time on Lake Michigan in an inflatable canoe
One of our "home bases" is a 5th wheel. We discovered the oven door would not close completely. I removed and dismantled the door but was unable to make an adjustment that would properly hold the door shut.
I decided to add a hasp, and this is a short video about that. It works very well and I tested it out on a batch of cinnamon buns.
Music, Dancing, Poetry, Storytelling, Wow, what a day! This year's theme was "Barn Dance & Western Swing". On Saturday February 3 G and I went to Sierra Vista, AZ for the Cowboy Poetry and Music Gathering. This post includes a link to a brief video, a few photos and a link. This is an annual event. This year's gathering had the theme "Barn Dance and Swing". So, there was dancing, music and of course, poetry! The event began on February 2 and ran through the 4th, but we could only attend on the 3rd. Bummer! The day was arranged into two segments. The first began at 10:00 am and ran until 5:00pm. During this period there were 30 poets, musicians and storytellers in 58 sessions in a variety of areas. The settings were informal and up close. Great opportunity to meet the artists and hear their performance. Each segment was 50 minutes in length. Pick your artists and venue and go to the segments you choose. Three segments were dedicated to lunch. The cost of the day was $10 for adults, and lunch is optional. I understand 30 musicians and poets from all over the US and Canada performed. This included several from Sierra Vista. In addition there were young students who performed their prize winning poems. There was a break from 4:30 to 6:00pm for the "Barn Dance" with music by Syd Masters & The Swing Riders. Lots of fun and we danced. Good for the soul. A second ticket allows one to attend the evening's entertainment. The cost for this was $20 per adult and several hours of entertainment were provided in a stage setting after the break. We'll definitely be attending next year; need to keep early February open in 2019. Our thanks to the 100+ volunteers who made this event happen.
Books, CDs and so on are available:
There's a cold front on the way, so even the deep southwest can get cold. Today's high about 71F, but it is really windy! Gusts out of the southwest at 30+ MPH.
Currently 58F, expected high 71F. But it feels colder because of the wind chill.
We took a trip to Tombstone, Arizona and spent two days in the area. We really enjoyed our time there. It is an interesting place, as are many of the mining towns we've visited. It has a number of museums, some tucked away inside establishments.
I made a video of our trip and a link is included in this post.
We entered Tombstone from the North-West travelling on Arizona Hwy 80, which becomes Freemont Street. At 6th street we made a right and drove a couple of blocks, crossed Allen Street to the free city parking on 6th Street.
First thing to do is to go to the Visitor Center on the corner of 4th and Allen and ask for help. We explained this was our first visit and we were given an official Tombstone City Map, and suggestions were made as to how to save some money by combining events, which we did.
A lot of museums
This is an old mining town with a number of official and unofficial museums. Here's a list of the one's we visited:
The Visitor's Center is actually an old bank.
O.K. Corral & Historama.
The museum associated with the O.K. Corral.
The Bird Cage Theatre which includes a museum.
Tombstone Epitaph (newspaper) Museum
Tombstone Courthouse State Historic Park
Old Tombstone Historical Tours (via stagecoach, fee required).
Boothill Graveyard (on AZ-80)
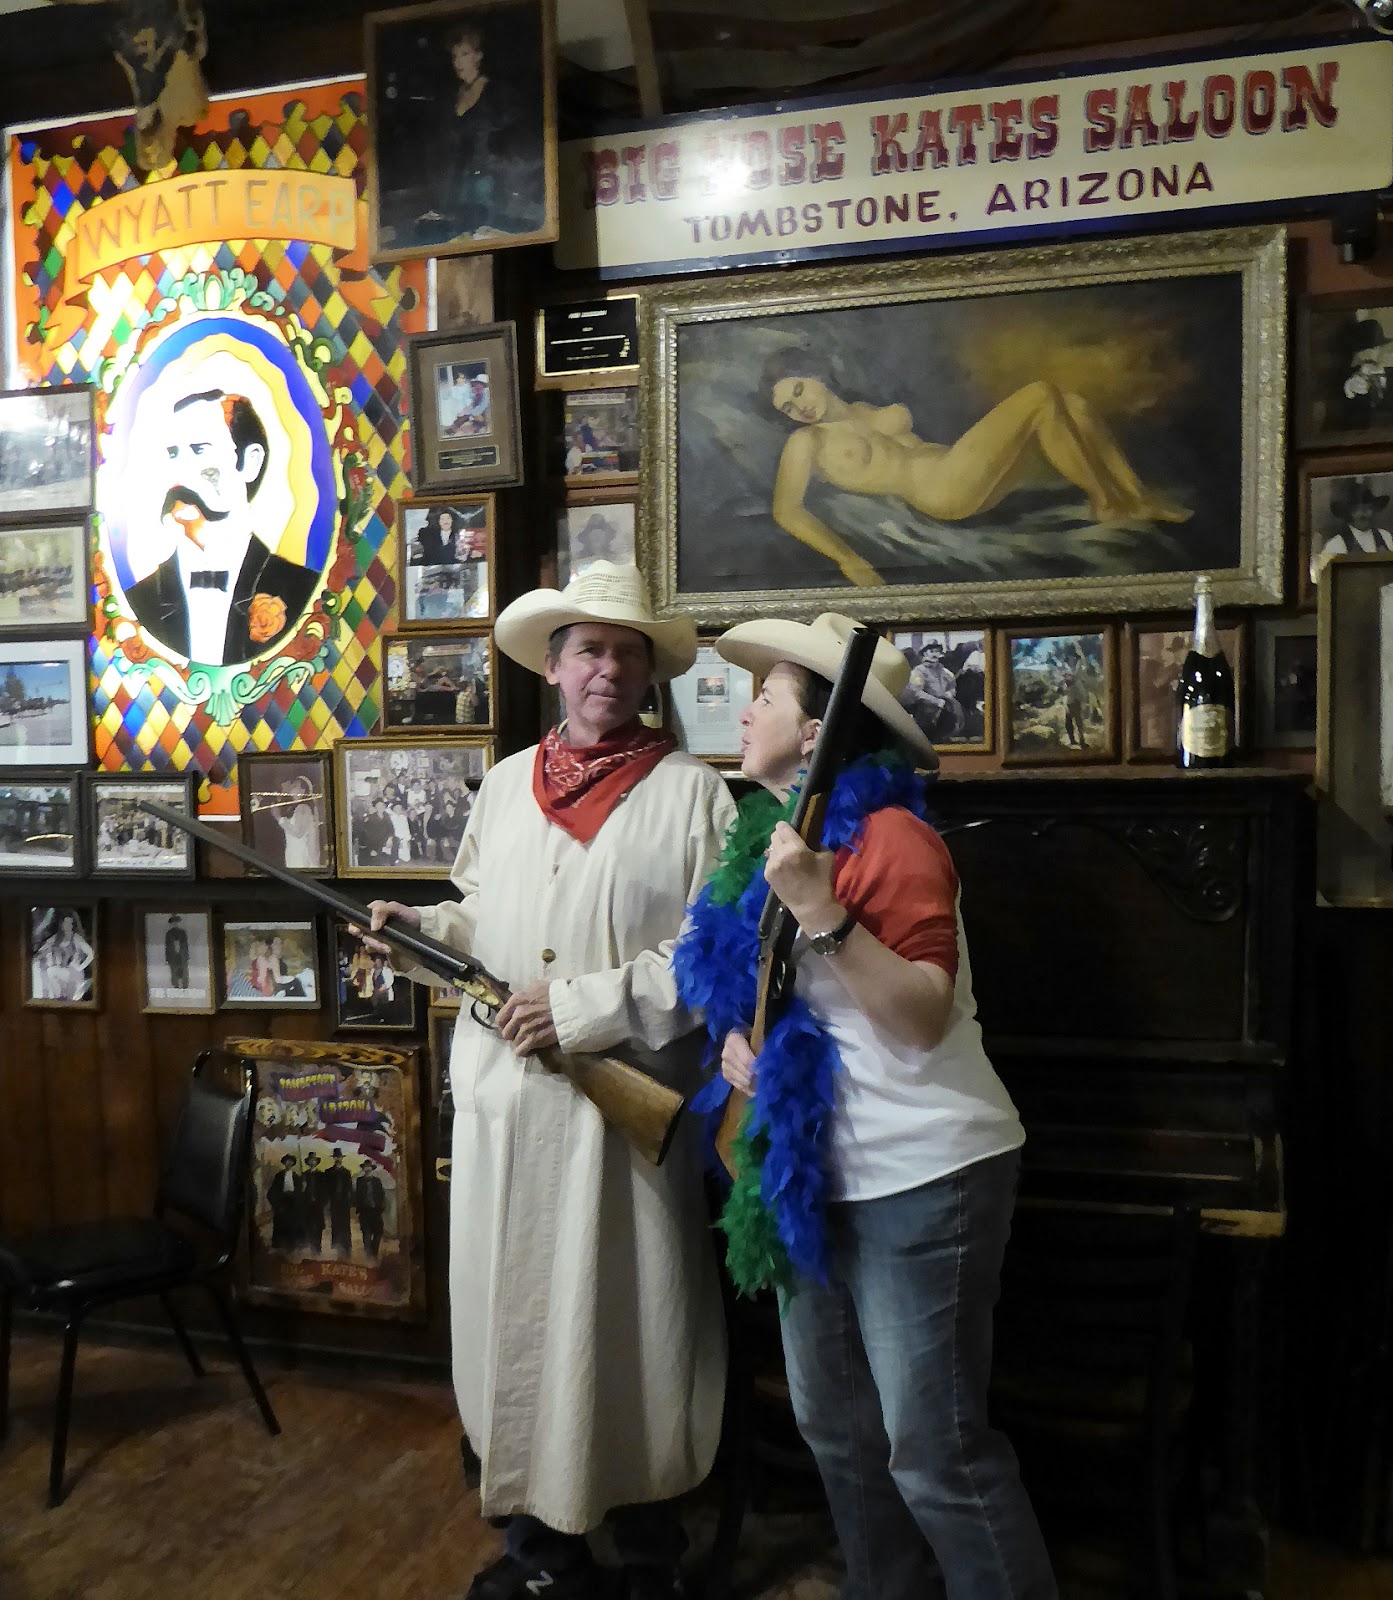
There are also "impromptu" museums, such as the one below "Big Nose Kate's Saloon & Restaurant" and the interior of some of the restaurants are quite colorful.
Characters
There are some very interesting people in Tombstone. There are hired "re-enactors" and there are also free-lancers, who dress as their character of choice and walk Allen Street. One individual I found to be very interesting is W.D. "Arizona" Kennedy who was sitting on the corner of Allen and 6th strumming his guitar. He has written and published a memoir "Chasing Rainbows And Similar Acts of Foolishness". I purchased a copy after our conversation and let ms say, he has led an interesting life.
Our Class B is the equivalent of a very well equipped "tiny" home. It has a 5 cu. ft refrigerator/freezer, a propane two-burner range top and a convection/microwave oven. We carry a portable induction electric burner and a small electric toaster.
Eating is one of those daily tasks which require cooking and as we both enjoy cooking we added an induction electric cook top and a portable propane grill. I've recently put together a short video about our cooking. I've attached a link later in this post.
Because of the size of the B we cook outdoors wherever possible. We like to cook and we travel to follow the sun, although we've had our share of cold weather treks (low while camping of about 5F or -15C). When the weather is cold we will use the rangetop or induction burner and the convection/microwave. However, one must be aware of the limitations of 30A AC shore power. One must also be careful about adding moisture to the air when it is very cold, as this will condense on cold surfaces such as windows, etc. We also prefer to conserve propane for the hot water heater and so we prefer to use the induction burner rather than the propane range top. Cast iron works very well with the induction burner.
We trek between stationary home bases which are a travel trailer and a 5th wheel. We call the travel trailer our "cabin" and we call the 5th wheel the "mother ship". When we are at those locales we can be more sophisticated in our cooking and the 5th wheel has an oven, although I am aware of the success of others baking with the convection oven in the Roadtrek. This arrangement is by design and we began planning this in 2000. We decided the trekmobile would come first as it would allow us to confirm our regional base choices.
We've trekked about 28,000 miles in four years and our longest in the Roadtrek was 110 days. We cook most of the time and choose local fruits and vegetables when in season and available. We supplement this with dining out, but usually choose things we won't or can't cook. That doesn't mean always simplistic things to prepare. Today G is working on eggplant parmigiana. I've made scratch cinnamon buns, but not in the Roadtrek; primarily because we can't easily carry all of the cooking paraphernalia required for baking in the Roadtrek.
Because we cook outdoors and in warmer weather most of the time we prefer fewer carbs and meals with salads and protein. When it does get cool we go for "comfort" foods including chicken soup and chili, etc. However, preparing these and storing the left overs have practical limitations with a 5 cu. ft. refrigerator.
The convection/microwave is wonderful for many foods. Ours has a dual mode which uses convection heat with microwave energy to cook foods. Works very well with chicken, etc.
One other practical issue is clean up. We prefer to cook outdoors where oils, moisture, smells, etc. are released into the outside air and not into the interior of the Roadtrek. Dining is sometimes inside but more frequently outside. Breakfasts on cool days may be prepared outdoors and eaten indoors.
Our summer location has had a bumper crop of pine cones this year. With them came a piney squirrel. That little critter would sit high in the tree and cut loose green pine cones. At about 6am each morning we'd be greeted with a constant "thump, thump, thump" as the squirrel jumped from branch to branch cutting lose pine cones. There was also the occasional "thwack" as a cone hit the AC.
I'd go up on the roof and clear off the sticky cones, loaded with pine sap. The trees are finally barren of green cones and the sap is reduced. The pace of cone dropping has moderated, but I've got quite a few piles on the ground.
I've added a few photos and a short video. That squirrel can strip a cone in 30 seconds or less. Thanks to his activities, we also have quite a few black capped chickadees and other birds hanging around, picking through the leftovers.
The "roof" is not that of the Roadtrek, thank heaven. It is a travel trailer on our summer "base camp" in Michigan. That base will shortly be shut down and we'll be Roadtrekking toward the southwest. Any plans for FL and the Florida Keys are now on hold pending the outcome of the recovery after this year's hurricane season.
Yesterday we attended an evening "Concert in the Park" at the veranda of the Wheaton, IL public library. Wheaton is the 32nd safest city in America, according to NeighborhoodScout’s 2017 list of the 100 safest cities.
The featured entertainment was "Steel Crazy" a musician/steel band from nearby Aurora, Illinois.
All content in this blog is provided for information purposes only. This blog contains the actions, opinions, and views of the author. The information contained here should not be consider “expert” and not taken as specific advice. The author makes no representations as to the accuracy, completeness, or reliability of the information on this site or that is found by following any link. The information contained here and in the links may become outdated.The author will not be held liable for any errors or omissions in this information. The author will not be held liable for any losses, injuries, or damages from the use or display of this information.
Why add a digital voltmeter-ammeter?
The decision to add a digital meter was easy. Then I proceeded to decide upon the type of meter. I had seen a FMCA Roadtrek Chapter Cyberrally post about how someone added a digital meter and I wanted to do the same.
Finding a meter wasn't all that difficult. A meter which stored "Ampere Hours" would have been ideal, but I opted for a digital voltmeter-ammeter-wattmeter. The selected meter also included adjustable alarm points for high and low voltage. That would be useful for monitoring low battery voltage, or a point at which I wanted to pay closer attention to battery draw.
I ordered the meter ($15.99 at the time) with DC shunt. I wanted to connect it directly to the battery so I could monitor battery voltage even with the battery disconnect "off". A switch and protective fuse was necessary. The parts list included:
Meter with 100A shunt
Off-On switch
Case for meter and switch (Case dimensions: 5-1/2" x 3-1/8" x 1-1/2")
25 ft. 4-conductor cable
Automotive fuse holder (I used a fuse from my kit)
Miscellaneous connectors.
Note: for details, see the parts list at end of this post.
The most difficult part for me was determining where to mount the meter. I had decided that I wanted a surface mount case, so I could remove the meter in the future and leave no trace. Determining how to run the 4/C cable was also a bit of a challenge. I decided to route it behind the fiberglass side panel, into the coach along side the door, then behind the side panel and exiting just below the 120VAC/12VDC power distribution center. This required the temporary removal of the rear passenger seat. Lots of screws.
Passenger seat removed, propane furnace exposed
With the passenger seat removed, it was possible to remove the side panel, and pull the cable behind the panel. I pulled the cable from the battery compartment to the passenger seat area, and re-assembled the interior panel. I left a foot lomg "pigtail" for connecting the meter.
Cable at Passenger Seat
I then mounted the rear of the meter case to the wall. I used 3M Dual Lock™ General Purpose Reclosable Fasteners. Note the female electrical connectors on the cable from the battery compartment:
Base of Meter Case
I assembled the meter in the case. Marked the case and cut the opening with a Dremel tool and cutting wheel. I used connectors so I can remove this if necessary. The "female" end goes on the cable from the battery compartment. The "male" end is in the meter case. This is so there should not be any exposed live parts if I pull the meter, even if the fuse at the shunt is intact.
Meter and Off-On switch in case
This is the front of the meter and switch, assembled in the case:
Front of meter case with Off-On switch
I mounted the meter to the case mounted on the wall:
Meter case mounted to the wall
This is the shunt, which was supplied with the meter. For the meter I purchased the shunt is connected between the negative battery post and the negative conductor. The shunt is rated 100A/75mV. The shunt is actually a precision resistor and the higher the current flowing through it, the higher the voltage drop across it. The voltage drop is 75 millivolts at 100 amperes.
Shunt
The shunt was installed in accordance with the manufacturer's instructions. A right angle screwdriver is helpful for installing the wiring to the shunt (I used a phillips).
CAUTION - Installing the shunt requires removing the negative battery lead. Exercise great care not to short a tool from negative to the nearby positive terminal. DEATH OR INJURY CAN RESULT. Be sure there is no battery load when doing this procedure.
The shunt is connected directly to the negative battery post. The black (Negative) cable is connected to the other side of the shunt; the yellow arrow points to that connection. Three of the leads of the 4-conductor cable is connected to the shunt. The fourth conductor goes to the red (Positive) battery terminal. I installed an automotive fuse between the positive battery terminal and the lead going to the meter. That is to protect the wire in the event of a short circuit
CAUTION - A properly sized fuse is necessary to protect the wire in the event of equipment failure or short circuit. Fire, damage, injury or death can result from an unprotected circuit.
Shunt installation and automotive fuse on positive battery terminal
With the installation complete I threw the "Off-On" switch to the "On" position.
I checked the display using a precision digital VOM. I measured the mV at the shunt and calculated the meter reading. The meter agreed.
Meter Setup
The meter has alarm points and some options:
Set backlight off or on. The default is "on".
Set voltage alarm threshold. The meter includes both "high" and "low" voltage alarms. These are set independently. The presence of an alarm flashes the backlight alternating "off" and "on". I set the low voltage alarm at the 50% DoD level for my coach batteries.
Set the measuring range. This meter will work with a 50A/75mV shunt or a 100A/75mV shunt. I set this to match the installed shunt, which is 100A/75mV.
Energy reset. The meter will accumulate and store kilo-watt hours (kWh). This value can be reset to zero.
Meter Limitations
The meter is a DC meter. This means that the ammeter measurement is polarity sensitive. The meter as connected can only measure discharge current from the battery across the shunt. When charging the meter displays 0.00 amperes. However, by reversing the connections it is possible to measure charging current. I tried this and it works.
It was interesting to watch the Tripplite inverter/charger step through the charging levels. I may add a DPDT switch for this purpose, but it is completely optional. I've monitored the Tripplite by watching the AC current; as the Tripplite throttles back the AC current decreases. However, other 120VAC loads will mask that. It is also possible to pull the compartment cover over the Tripplite and observe the charge state LEDs:
Green = Full Charge
Detailed Parts list, my cost $36.45 plus tax and any shipping:
MICTUNING DC 6.5-100V 0-100A LCD Digital Display Ammeter Voltmeter Multimeter Volt Watt Power Energy Meter Blue with 100A/75mV Shunt, Part No. MIC-DVG-015.
Serpac black plastic case, model 151i, BK.
Rocker switch, Philmore No. 30-882.
4-conductor shielded cable, 24 AWG. (Use #22-24 AWG; smaller AWG is easier to pull).
Insulated terminal disconnects, male and female (from toolbox, not included in price total).
Fuse and fuseholder to protect the wire from the meter to the (+) positive battery terminal. Size of the fuse is determined by the size of the wire.