7 Pages are shown on the Main Page.

7 pages are shown on the Main Page. To see additional posts, click on the link "Older Posts" at the bottom of the main page. For videos go to https://www.youtube.com/@normanretzke4377/videos click "skip" to avoid ads


G has a "swell" time kayaking

G has a "swell" time kayaking
G has a "swell" time on Lake Michigan in an inflatable canoe

Dawn on the Gulf of Mexico

Dawn on the Gulf of Mexico

Warren Dunes Sunset

Warren Dunes Sunset
Warren Dunes Sunset

Monday, June 25, 2018

Repair of the Continental Tire Carrier on a 2012 Roadtrek 210P


Bookmark and Share


Bruce Roberts has a 210P and discovered that the steel cable on his rear tire carrier was frayed. He had read my blog and had some questions about my February 27, 2017 blog post about repainting my tire carrier. So he contacted me via email.

Bruce had contacted Roadtrek about the possibility of repair. Bruce says that Roadtrek offered to sell a complete unit, but did not offer a repair. So Bruce decided to explore repairing it on his own. We corresponded about potential issues if a repair was undertaken. Bruce had a local firm that could fabricate the necessary cable, so the real issues were about disassembly and re-assembly.

The local firm could give him a replacement cable "made to order" to match the existing. Not too difficult if one can remove the old and give it to someone to match so the length and cable diameter is proper.

So Bruce proceeded with the repair and he had success. I asked Bruce if he would be willing to share his experience and he said "yes". Here is what he said about this "This is our first RV. We had never camped. Most of what I know about the RT is from reading blogs. I think it is important to give back something, so I am glad that you suggested writing a blog about repairing the carrier."

Thanks, Bruce for sharing your knowledge and experience with us in the RT community.

Here are Bruce's notes and some photos he put together about the repair. He agreed to let me share them here:


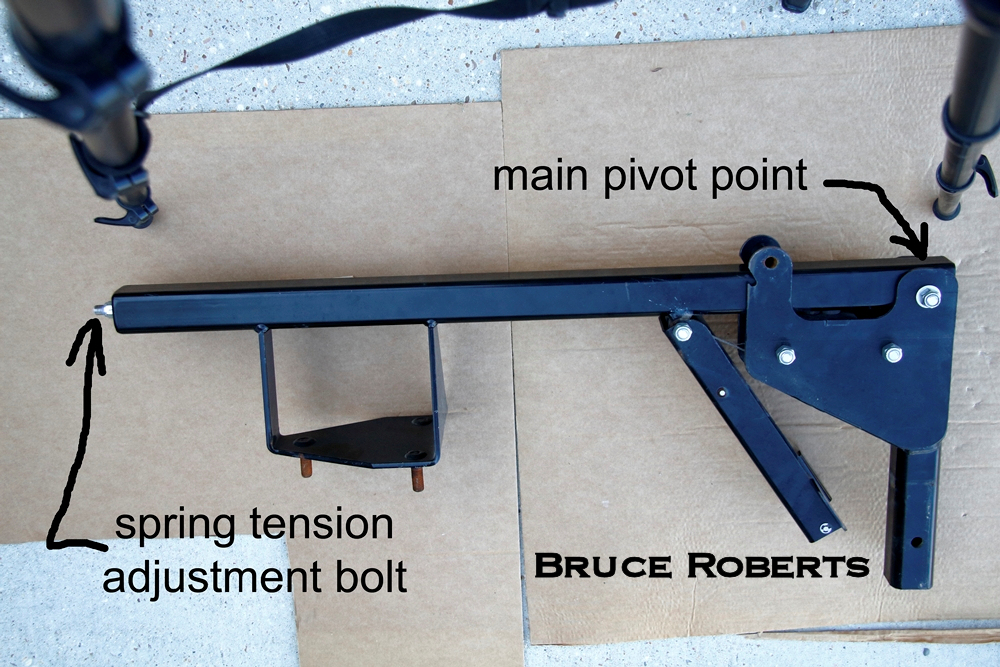
"Below are miscellaneous thoughts/comments concerning disassembly and reassembly of
the tire carrier.  They are in no particular order. My cable was frayed and needed to be replaced.
  1. One end of the cable is attached to the tension spring and is not designed to be separated.
  2. All of the tension can be removed from the spring by backing down the spring tension bolt.
  3. The cable can’t be removed from the assembly without removing the pulleys first.
  4. The spring is under the least tension when the tire is upright in its normal position.
  5. Two of the three pulleys have spacers on either side.
  6. The pulley without spacers is smaller than the other two pulleys.
  7. The carrier is designed to have the pulleys rotate freely.
  8. The cable can fray if the pulleys don’t rotate.
  9. The bolts associated with the cable and pulleys are grade 5 and the nuts have nylon inserts.
  10. The smaller pulley is located at the hinge point for the two tubular pieces.  There are 4 flat washers on the bolt that holds this pulley.
  11. The cable on my unit was 26 ½ inches long and was 3/32 inches in diameter.
  12. The carrier was removed from the RT prior to disassembly.
Disassembly sequence after removal from RT
  1. Make notes concerning the distance between the top of each nut and the end of the bolt. 
  2. Lay the carrier on a flat surface and remove all tension from the spring by backing down the tension adjustment bolt at the top end of the carrier.  A 19 mm socket was used on all bolts and nuts including removing the carrier from the RT. 
  3. Remove the bolt that holds the free end of the cable. Remove the pulleys starting with the one closest to the free end of the cable. Keep associated bolt, pulley, nut, and spacers/washers together. (On my unit, the smaller pulley was stuck on the bolt. I first tried tapping the end of the bolt with a hammer and piece of wood. That didn’t work. I sprayed lubricant on the bolt beside the pulley and tapped it again.  That still didn’t work. I slid the handle of a socket wrench down beside the pulley and tapped it again. This time it worked. Prior to using the socket handle, only the top edge of the pulley was touching the notched portion of the square tubing and perhaps cocking the pulley as I tapped on the end of the bolt.) 
  4. Remove the nut on the tension adjustment bolt and remove the cable, spring, and tension adjustment bolt assembly. 
  5. Clean bolts, pulleys, nuts, and spacers and inspect for wear. 
  6. Clean the cable, spring, and tension adjustment bolt assembly and inspect for wear. Clean and repaint the two square tubing pieces as needed.
Reassembly sequence
The carrier was laid flat on a piece of cardboard with the three studs that hold the spare tire facing upward.  Garage door spring lubricant was used to coat the spring.

  1. Insert spring and cable assembly into the long section of square tubing and install the nut used to adjust the spring tension. Three turns on the nut were sufficient to keep the spring in place. To aid in the installation of the spring and cable assembly, a plastic garden stake was inserted into the square tubing. The spring tension adjustment bolt was butted up against the end of the garden stake and a small piece of duct tape was used to hold the pieces together. The other end of the garden stake was pulled while the spring and cable assembly was pushed into the square tubing.
  2. Install the smaller pulley.  The short section of square tubing was properly aligned and the cable was held in place with a clothespin. Lithium grease was sprayed on the bolt and pulley before and after installation. A cable tie strap was wrapped around the pulley to help hold the pulley while the bolt was inserted through the tubing.  The tie strap wasn’t clamped to the pulley; it was just wrapped around it. Note there are four flat washers associated with this bolt. The nut was tightened enough to allow the short section of tubing to still pivot freely.
  3. Install the next pulley in line.  Lithium grease was sprayed on the bolt and pulley before and after installation.  A cable tie strap was wrapped around the pulley and second spacer to help hold them while the bolt was inserted through the tubing.  The cable was held in place with a clothespin. Insert the bolt part way and slide on the first spacer. Hold the pulley in place with the cable tie and insert the bolt so that it is flush with the other side of the pulley.  Hold the second spacer in place with the cable tie strap and push the bolt through the other side. Install nut and tighten. Check for free rotation of the pulley. Tighten the nut until the pulley binds and loosen the nut about 1/8 turn.
  4. Install the last pulley. Follow the same procedure used for the previous pulley.
  5. Inspect the cable to ensure it is in the pulleys. Adjust the cable if has come off of a pulley. 
  6. Lift the short section of tubing upward so it is upright.
  7. Secure the free end of the cable and the catch plate to the carrier.  Tighten the nut until the catch plate binds and then loosen the nut about ¼ turn.  Spray bolt with lithium grease. 
Bruce's Notes :
  1. The carrier should be inspected and lubricated periodically, but I don’t know how often.  It will depend on usage and weather conditions.
  2. The pulleys need to rotate freely.
  3. There is a few thousands play between the pulley and spacers so additional lubricant can be added at a future time without having to disassemble the carrier.
  4. This is our first RV. We had never camped. Most of what I know about the RT is from reading blogs. I think it is important to give back something, so I am glad that you suggested writing a blog about repairing the carrier.
  5. The new cable cost $20.20."


Original material:  https://roadtrek210.blogspot.com/

Friday, June 22, 2018

At the Beach, revisited


Bookmark and Share


Well, the weather patterns changed and it has been about 25F cooler in recent days than it was over the weekend. With the change we've had near constant cloud cover and fog, as the rains approached. Love it when that warm gulf air meets a northern cold front. We've strolled the beaches, hunkered down a bit and I've been doing what I call "non-productive" work. That is work that generally doesn't generate income. These efforts include volunteer effort, blogging, reading financial and retirement articles, and doing business overhead matters. Never a dull moment.

The cooler weather has been pleasant, but with it the humidity has increased dramatically. The mosquitoes love this. We find that walking along the lake is a great escape, as the westerly breezes blow the little suckers inland. At the beach there is a bug free zone and those that do migrate toward the shore are tasty treats for the many swallows who constantly clean up the skies. At the pond we have dragonflies who carry out the same duties. In the past week I think I got one bite, which really isn't all that bad. We haven't had to use repellent yet this year.

Most of my internet related work is accomplished using a Verizon jetpack. It is not uncommon for campground internet to be intermittent. We've discovered this all over the U.S. So we use it when available and if it isn't, then out comes the jetpack. The jetpack is how I'm able to do this blog, upload videos, etc. If not for it, I'd be limited to email.  In fact, yesterday I edited and uploaded the HOA newsletter. Not possible if not for the jetpack.

Walking at a nearby beach.
The Roadtrek 210P

A sailboat was the only recreational vehicle in sight on the water

We also visited a nearby state park and it too was quiet. But there are always a few who simply come here to relax.


Overcast at the shore:

Moby turtle was cruising the pond:


The weather got wetter:

This mornrng's rain
Recent rainfall totals
Original material:  https://roadtrek210.blogspot.com/


Sunday, June 17, 2018

Lake Michigan Shore Winefest


Bookmark and Share


We attended the winefest with friends. Hot and sunny. Nice breeze off of the Lake. Good music, too. Here's a short video:


Original material:  https://roadtrek210.blogspot.com/

Sunday, May 27, 2018

Chicago River Tour - Metra Train


Bookmark and Share


If you get to Chicago take one of the Chicago River boat tours. My favorite is the Architectural tour, which is available during daylight hours and also at night. At night there are all of the lights of the buildings to admire, too.  Getting into the city and to the river can be a traffic and parking issue, which is why we take the Metra train into the city. City parking is expensive and at times non-existent. The City has put parking meters on just about every street that can bring in revenue.

The Chicago area has an extensive commuter Metra train system which extends into and beyond the nearby suburbs. On weekends a "Weekend Pass" is good for unlimited rides on all Metra lines. As of May 2018 cost for a pass is $10.  For the Memorial Day weekend the pass was good for three days, 5/26, 27, 28!

Travel to and from other communities to Chicago's Union Station via Amtrak is also possible. For example, St. Joseph/Benton Harbor MI via Amtrak  to Chicago is $46 round trip, plus any taxes per adult. Seniors and children get a discount.

On Memorial Day weekend travel into big cities can be challenging. For example, on Memorial Day weekend rather than drive an RV or car, a train ride can be preferable. No parking or traffic issues, etc. That's the method that was used for the holiday weekend to enjoy the river boat tour:


Metra Weekend Ticket - A Bargain!

Note: River photos by G and friends.


Original material:  https://roadtrek210.blogspot.com/

Thursday, May 24, 2018

The Summer ""Lily Pad" is open!


Bookmark and Share


We had the opportunity to get a deck at the summer campsite. This is a 30 foot travel trailer which we call "the cabin."  It's on a partially shaded site at a nice pond. G likes to call it "one of our lily pads."  Will we be at this site in a few years? Probably, but we do have the option of moving it to another locale if we choose.

Today I finished putting the deck together, got the stairs in and also the new firepit. We're ready for summer!

I'm mentioned in other posts that our approach to "full timing" is a modified one. We use the Roadtrek to go to National Parks and to see things all over the U.S. With the Roadtrek 210P we can go just about everywhere a car can go.  Think of it as a portable motel room.

But living full time in a 21 ft Class B can be a challenge. We've done it for up to 110 days when the weather was dry and comfortable.   We've done shorter winter treks and camping in the winter can be challenging. I've posted about that before.  We'd like to use this lily pad to explore more of MI, the Upper Peninsula. I'd also like to go back to Quetico.


One of our neighbors, the piney squirrel. He or she is back too:


Evening at the lakeshore. We walked to the lake from our cabin. A few tried to fly kites yesterday evening, but it was too calm (that is a kite to the right of the tree, at the water line):


We spotted a heron in a nearby tree:


The barn swallows are nesting. This one took a brief rest. Pregnant?:


Currently it is very quiet at the lakefront. This will soon change:

Original material:  https://roadtrek210.blogspot.com/

Saturday, May 19, 2018

Springtime monsoons and settling into the "cabin" at the Lake - Building a Deck


Bookmark and Share


Updated October 15, 2018:  Added a photo of the stained and completed deck

Original Post, May 19, 2018:
Spring has sprung, sort of. It was late this year and we didn't get back until April 30, choosing to stay in the warmth. Upon return it was cool and buds were just popping out on the trees. So we hadn't missed spring at all!

We unpacked, did laundry, some shopping for groceries and basically got re-oriented. We then re-packed and went to the "cabin" at the lake on May 3 and opened it up and freshened it up. Our "cabin" is a 30 ft travel trailer. It is one of our "lily pads" and it is more or less permanently parked at a campground; we pay a seasonal rate and winter storage to maintain it there. The Roadtrek will be parked nearby for a while. We'll be planning our next grand adventure, but if time permits we'll be taking some shorter treks.

Frequent readers will know that we have several "lily pads" we've set up and for all practical purposes we are "full timers" but we live in or at the lily pads for much of the year, using these as bases as we take the Roadtrek for adventures of a week or several months, hopping from lily pad to lily pad.

Currently we're prepping the cabin for summer. Some projects this year include building a deck, which is a major improvement.  We'd discussed this possibility since we began using that campground in 2014 with longer stays commencing 2015.

However, the project has been delayed by rain. For more than a week rain has been nearly continuous, with only short breaks. Back at Mondo Condo there was a microburst a few houses away which felled a healthy spruce.  This unfortunate tree was planted in shallow soil on top of clay:


As of yesterday even the campground with the cabin had not yet dried out. It's currently overcast, but dry as in "drying out."   Here's a short video taken over several days at the condo, nearly a week of daily storms:


Now to build the deck at the cabin. Last year an annual resident vacated his site but left his deck behind. The new tenant decided he didn't want it and I got permission from all parties including the owner of the campground to dismantle it. So at the end of October 2017 I did:

Disassembly prior to moving the deck, October 29, 2017
I consider myself fortunate to get the deck for the cabin. The only problem was it needed to be deconstructed and relocated to my site. It measured 10 ft x 16 ft and the deck boards were fastened with more than 500 nails. It was an arduous job to deconstruct it last fall. Of course it rained.

I worked on it for a day with a hammer and wonder bar and removed all of the nails. Whew! Then I cut the frame into three sections, each about 10 ft x 5 ft. 4 inches. With help I was able to carry and transport the boards to our site. It was cool, raining and damp most of the time, which made the work more difficult.  On the final morning with the decking on the site the sun came out.

I don't think we had the opportunity for a final campfire on our last night. On the final day we got up early and loaded the bikes onto the Roadtrek's bike rack, did the final winterizing of the cabin and winter prep of the deck components, including tie downs "just in case."  We then made a brief stop before heading to the winter lily pad in Arizona.

Ready to cover for winter. 

Reconstructing the relocated deck - May 2018
The reconstruction of the deck was somewhat easier than building one from scratch. I purchased about $75 in materials including nails, deck screws, (14) 4 x 8 x 16 inch concrete blocks, (2) 8 ft 2 x 4s (suitable for direct contact with earth) and a gallon of Cabot semi-transparent oil based stain.

We decided to relocate the fire ring, and will put in a larger one 36 inches in diameter, on concrete base.

G and I discussed options for where to put the deck. The awning is about 16 ft wide and we decided to put the deck parallel to the cabin and from rear door forward, roughly under the awning. I put it about 16 inches from the vertical side of the cabin. Using a string line I placed concrete blocks at the corners and decided it looked good.

The deck frame will rest on concrete blocks and will be above the soil, but on one end the top of the block will be only about 1/2 inch above the soil. That is the end farthest from the pond. At the other end, the top of one corner block will be about 3-1/2 inches above the soil. This is very sandy soil with a good slope to the pond. That's a good thing for drainage.

The blocks were positioned so that there is a slight slope to the top of the deck away from the cabin. I'd like the water to drain away from the cabin. This took a bit of juggling. The positioning of the blocks, digging holes to get the top surfaces level, assembling and straightening the three frame sections, adding 2 x 4 joiners and placing the deck planks on the frame took about 8 hours. A string line was used to check straightness and a 4 ft torpedo level was used to check just how level the frame is, in all directions of length, width and diagonal.

In all the deck frame rests on 14 blocks. The blocks are arranged under the framing so that there are three across the 10 ft. width. One at each outside frame and another in the center. For the 16 ft length there are also blocks, one at the ends and two in the middle. Because of the seam of the frame I used two blocks at each seam to be certain that both ends of the joint will be supported.

In this manner the frame will be supported by concrete blocks about every 5 feet in all directions.

Corner on three blocks
Based upon measurements, only 12 support blocks would be required. But there are joints where disassembly cuts were made. I wanted both sides of the joint to rest on a block. That required two additional blocks. Note the string line on the ground. That's how I got the sections to be "straight" before nailing together and adding additional 2x4 supports.
Two of the sections had a seam at a corner. To provide additional support and prevent the load being entirely on nailed sections I used 2 blocks side by side at both ends of that seam. 
Here's the entire frame assembled, resting on (14) concrete blocks, and with 2x4s added to brace the sections at the joints. I added two pieces in the very center at the seams for additional stability. Only (1) 8 ft 2x4 was used for this.
Entire frame re-assembled and on (14) blocks 

Satisfied with the frame and supports I put all of the deck boards on top of the framing. These are pressure treated pine deck board suitable for above ground use. (Common: 5/4-in x 4-in x 16-ft; Actual: 1-in x 3.5-in x 16-ft).

Deck boards resting on frame

Next Steps:
With the return of monsoons the screwing down of the planking will have to wait. Also need to do some work on the wooden stairs (lying on their side in the photo above). And, the firepit needs to be positioned at the end of the deck.

I'll light sand the top of the decking to smooth any splinters and with dry weather I'll stain the deck and the stairs. [Note: I used Cabot's "Semi solid deck and siding stain". I've used this particular product family for years and have always been pleased with the result. We chose "Beechwood Gray" as a neutral color.]

Stained deck and stairs. Photo October 2018

Original material:  https://roadtrek210.blogspot.com/