7 Pages are shown on the Main Page.

7 pages are shown on the Main Page. To see additional posts, click on the link "Older Posts" at the bottom of the main page. For videos go to https://www.youtube.com/@normanretzke4377/videos click "skip" to avoid ads


G has a "swell" time kayaking

G has a "swell" time kayaking
G has a "swell" time on Lake Michigan in an inflatable canoe

Dawn on the Gulf of Mexico

Dawn on the Gulf of Mexico

Warren Dunes Sunset

Warren Dunes Sunset
Warren Dunes Sunset

Monday, July 2, 2018

Installing a Fresh Water Shutoff for Toilet


Bookmark and Share


A few years ago I had a leak at the fresh water fitting of the toilet in the Roadtrek. That was primarily a nuisance because it is a wet bath and any water is contained within (unless it overwhelms the volume of the bath area and gray tank).

I solved that problem with a little TFE paste which is suitable for use on nylon fittings. I posted a video at the time about this.

Recently we had a slightly different and much more serious problem with a Thetford toilet. The fresh water valve failed to close. As is often true with "Murphy's Law" the problem occured at night, at the "most inopportune time". Gradually the toilet bowl filled and overflowed. We didn't hear it. In the middle of the night we discovered water was flowing out of the bathroom.

[Note: this post is not about the pluses or minuses of a Thetford. We like our "made in USA" Thetfords and wouldn't change them for anything. We have three rigs (two are Lily Pads and in all there are four Thetford toilets). In fact when we decided to change a toilet recently we went with a Thetford Aqua-Magic II. A contractor recommended another brand and we said "No". So I purchased and installed the toilet myself. $153.12, delivered price. ]

Now, unlike the toilet in a sticks n' bricks abode, RVs generally don't have a shutoff for the fresh water inlet to the toilet. So when we discovered we had a toilet fresh water issue I had to run outside and turn off all water to the rig. The water had to stay off until I could resolve the issue with the toilet. Of course, we could have turned on the fresh water pump when water was necessary but that too is risky. (Note: We did turn off the hot water heater "better safe than sorry" if the level in the heater fell.).

I decided that we needed a shutoff valve for the toilet. But that's easier said than done with such tight quarters. Not only is there limited space for a valve, there is also limited space to operate it.

I wanted something that would not require modification of the PEX piping.

I did find a very small valve with an easy slide "off-on" feature and decided to try it. I decided it would be easy to operate in the blind, by touch and without the ability to observe the valve, and it is!  Cost? $8.60. It is a "KES Shower Head Shut-Off Valve Ball Valve 1/2-Inch NPT BRASS Polished Chrome, KUS1140B"

Here are a few photos:

Toilet fresh water inlet - no valve.

Photo of the valve, to give an idea of the size

Suppliers photo of the valve.
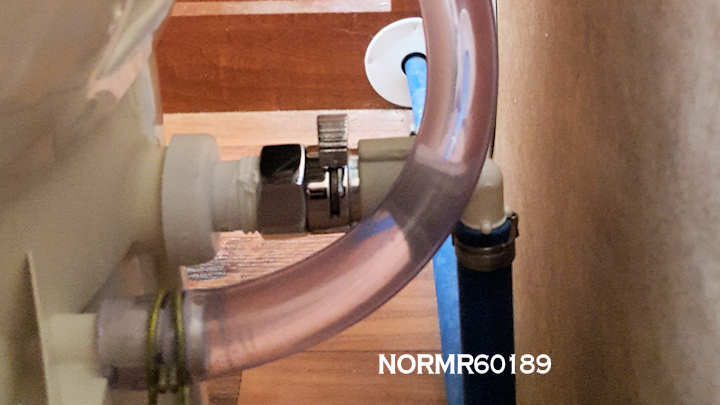
Photo with valve installed. Fits well and works "wonderfully" and I don't have to see it to operate it. 
Here's a link to the earlier video about a dripping fresh water inlet to the toilet in the Roadtrek; this was solved with a little TFE paste applied to the threads:


Original material:  https://roadtrek210.blogspot.com/


Adding a Vent Fan to the Travel Trailer


Bookmark and Share


Our travel trailer, which is one of our lily pads, has a vent in the bedroom, but no fan. We get afternoon sun and decided we'd like a roof fan in that room. The vent lid was showing some fatigue and so I decided to:
  1. Replace the vent lid.
  2. Add a vent cover so we can leave the vent lid open when the TT is unattended. This also affords additional protection to the lid, keeps birds from moving in, etc.
  3. Add a fan inside the existing vent. I chose a fan which is rated 188CFM and  designed to retrofit within an existing 14 x 14 housing. 
I have three vents, so I needed three vent lids and three covers to replace all.

I found replacement vent lids for about $19 each delivered so I purchased enough to do all three vent lids. (I purchased two sets of two because the price was better than buying three singles. So I now have a spare which I can give to a neighbor).

I also purchased three vent covers; two white and one smoke tint for about $28 each. I purchased one fan kit for the existing vent. The fan was about $59.

Total price each set of vent lid and vent cover = $47 each set.
Vent fan = $58.50
Labor: $0 (I'm free)
Wire, etc $0, from my hardware box.

The vent lid replacement was very easy. I did need G inside to open and close it on request for testing of the new one. Tools were a phillips screwdriver and a needle nose pliers. To remove the lid I removed the crank handle, the inside screen and the two screws holding the mechanism in place. That allowed me to open it fully from the roof and slide the mechanism off of the old lid. I put the mechanism aside, bent the tabs which held the vent lid in place and slid the old lid off of the full width hinge.  I took the opportunity to clean the existing gasket and the screen.

The new lid went on in the reverse fashion. I slid it on and bent the tabs to keep it in place on the hinge. I then went inside the trailer and inserted the mechanism into the mating connector and screwed it in place. Then the screen went back and is held in place with two screws. Finally the crank handle was re-attached.   Time to do this per vent lid was less than 30 minutes.

Each vent cover went on in about 20-30 minutes.

Clean up about 30 minutes.

The  fan took a while because I had to drill an opening for two wires (I provided two #18 AWG per the fan instructions). I pulled the wires from an existing fixture to the fan location. I attached to the power of an existing light fixture for source of 12VDC. The fixture has two 1141 incandescent bulbs which draw a total of 3.06A. The fan draws 2.2A, I understand. With the dual fixture off, this circuit will draw less than the current draw of the bulbs. I may change this lighting fixture to LED bulbs to keep the current near the original 3A. The bedroom has three fixtures total with (4) 1141 12V bulbs, which is a total lighting load of 6.12A.

The fan is a 5 speed 3-forward and 2-reverse and is very quiet at the low and medium settings. We're quite pleased with it. 

Fan in box

Out of the box - CAUTION don't hang the fan from the wires during installation. According to the manufacturer doing so will damage the fan. 


Typical roof vent with the old vent lid removed. Note the mechanism hanging so  could remove the lid. I've cleaned the lid gasket. 

New vent lid installed

Wiring of existing lighting fixture -this will also supply the fan. CAUTION - make certain DC power is off before working on wiring. Note the interior of the vent lid is completely removed, so I could drill a hole and pull the new wires in the ceiling to the fan location. 

After drilling a hole I fished the new wiring through, attached it to the existing lighting. The meter is to verify polarity before wiring the fan. I did install a split grommet to protect the wiring where it goes through the thin aluminum sidewall of the opening. 

New fan completely installed. It went in place of the existing crank arm and the old screen. Most difficult part was aligning the new crank handle system to the existing lid mechanism while holding it up. G helped. The frame is the existing frame. CAUTION - Don't hang the fan from the wiring during installation. The manufacturer says that will damage the fan. 

Aligning the vent cover with the vent. Then after placing the cover in place I  marked the location of the brackets on the roof. No holes are required in the roof. The markings are to indicate where along the vent perimeter to place the brackets. 

Four brackets installed and ready to place the vent cover in position. This is before cleaning the old gasket.

Close up of cover bracket. It is held in place with a 3/16 screw with washer, lockwasher and nut. The arrow points to the alignment mark I made when I positioned the cover over the closed vent. The mark indicates where to place the bracket before drilling the hole in the side of the vent frame. 

Smoke vent cover over the new vent lid and fan

White vent cover over a new vent lid. I installed a total of three replacement vent lids and two vent covers.
Original material:  https://roadtrek210.blogspot.com/

Monday, June 25, 2018

Repair of the Continental Tire Carrier on a 2012 Roadtrek 210P


Bookmark and Share


Bruce Roberts has a 210P and discovered that the steel cable on his rear tire carrier was frayed. He had read my blog and had some questions about my February 27, 2017 blog post about repainting my tire carrier. So he contacted me via email.

Bruce had contacted Roadtrek about the possibility of repair. Bruce says that Roadtrek offered to sell a complete unit, but did not offer a repair. So Bruce decided to explore repairing it on his own. We corresponded about potential issues if a repair was undertaken. Bruce had a local firm that could fabricate the necessary cable, so the real issues were about disassembly and re-assembly.

The local firm could give him a replacement cable "made to order" to match the existing. Not too difficult if one can remove the old and give it to someone to match so the length and cable diameter is proper.

So Bruce proceeded with the repair and he had success. I asked Bruce if he would be willing to share his experience and he said "yes". Here is what he said about this "This is our first RV. We had never camped. Most of what I know about the RT is from reading blogs. I think it is important to give back something, so I am glad that you suggested writing a blog about repairing the carrier."

Thanks, Bruce for sharing your knowledge and experience with us in the RT community.

Here are Bruce's notes and some photos he put together about the repair. He agreed to let me share them here:


"Below are miscellaneous thoughts/comments concerning disassembly and reassembly of
the tire carrier.  They are in no particular order. My cable was frayed and needed to be replaced.
  1. One end of the cable is attached to the tension spring and is not designed to be separated.
  2. All of the tension can be removed from the spring by backing down the spring tension bolt.
  3. The cable can’t be removed from the assembly without removing the pulleys first.
  4. The spring is under the least tension when the tire is upright in its normal position.
  5. Two of the three pulleys have spacers on either side.
  6. The pulley without spacers is smaller than the other two pulleys.
  7. The carrier is designed to have the pulleys rotate freely.
  8. The cable can fray if the pulleys don’t rotate.
  9. The bolts associated with the cable and pulleys are grade 5 and the nuts have nylon inserts.
  10. The smaller pulley is located at the hinge point for the two tubular pieces.  There are 4 flat washers on the bolt that holds this pulley.
  11. The cable on my unit was 26 ½ inches long and was 3/32 inches in diameter.
  12. The carrier was removed from the RT prior to disassembly.
Disassembly sequence after removal from RT
  1. Make notes concerning the distance between the top of each nut and the end of the bolt. 
  2. Lay the carrier on a flat surface and remove all tension from the spring by backing down the tension adjustment bolt at the top end of the carrier.  A 19 mm socket was used on all bolts and nuts including removing the carrier from the RT. 
  3. Remove the bolt that holds the free end of the cable. Remove the pulleys starting with the one closest to the free end of the cable. Keep associated bolt, pulley, nut, and spacers/washers together. (On my unit, the smaller pulley was stuck on the bolt. I first tried tapping the end of the bolt with a hammer and piece of wood. That didn’t work. I sprayed lubricant on the bolt beside the pulley and tapped it again.  That still didn’t work. I slid the handle of a socket wrench down beside the pulley and tapped it again. This time it worked. Prior to using the socket handle, only the top edge of the pulley was touching the notched portion of the square tubing and perhaps cocking the pulley as I tapped on the end of the bolt.) 
  4. Remove the nut on the tension adjustment bolt and remove the cable, spring, and tension adjustment bolt assembly. 
  5. Clean bolts, pulleys, nuts, and spacers and inspect for wear. 
  6. Clean the cable, spring, and tension adjustment bolt assembly and inspect for wear. Clean and repaint the two square tubing pieces as needed.
Reassembly sequence
The carrier was laid flat on a piece of cardboard with the three studs that hold the spare tire facing upward.  Garage door spring lubricant was used to coat the spring.

  1. Insert spring and cable assembly into the long section of square tubing and install the nut used to adjust the spring tension. Three turns on the nut were sufficient to keep the spring in place. To aid in the installation of the spring and cable assembly, a plastic garden stake was inserted into the square tubing. The spring tension adjustment bolt was butted up against the end of the garden stake and a small piece of duct tape was used to hold the pieces together. The other end of the garden stake was pulled while the spring and cable assembly was pushed into the square tubing.
  2. Install the smaller pulley.  The short section of square tubing was properly aligned and the cable was held in place with a clothespin. Lithium grease was sprayed on the bolt and pulley before and after installation. A cable tie strap was wrapped around the pulley to help hold the pulley while the bolt was inserted through the tubing.  The tie strap wasn’t clamped to the pulley; it was just wrapped around it. Note there are four flat washers associated with this bolt. The nut was tightened enough to allow the short section of tubing to still pivot freely.
  3. Install the next pulley in line.  Lithium grease was sprayed on the bolt and pulley before and after installation.  A cable tie strap was wrapped around the pulley and second spacer to help hold them while the bolt was inserted through the tubing.  The cable was held in place with a clothespin. Insert the bolt part way and slide on the first spacer. Hold the pulley in place with the cable tie and insert the bolt so that it is flush with the other side of the pulley.  Hold the second spacer in place with the cable tie strap and push the bolt through the other side. Install nut and tighten. Check for free rotation of the pulley. Tighten the nut until the pulley binds and loosen the nut about 1/8 turn.
  4. Install the last pulley. Follow the same procedure used for the previous pulley.
  5. Inspect the cable to ensure it is in the pulleys. Adjust the cable if has come off of a pulley. 
  6. Lift the short section of tubing upward so it is upright.
  7. Secure the free end of the cable and the catch plate to the carrier.  Tighten the nut until the catch plate binds and then loosen the nut about ¼ turn.  Spray bolt with lithium grease. 
Bruce's Notes :
  1. The carrier should be inspected and lubricated periodically, but I don’t know how often.  It will depend on usage and weather conditions.
  2. The pulleys need to rotate freely.
  3. There is a few thousands play between the pulley and spacers so additional lubricant can be added at a future time without having to disassemble the carrier.
  4. This is our first RV. We had never camped. Most of what I know about the RT is from reading blogs. I think it is important to give back something, so I am glad that you suggested writing a blog about repairing the carrier.
  5. The new cable cost $20.20."


Original material:  https://roadtrek210.blogspot.com/

Friday, June 22, 2018

At the Beach, revisited


Bookmark and Share


Well, the weather patterns changed and it has been about 25F cooler in recent days than it was over the weekend. With the change we've had near constant cloud cover and fog, as the rains approached. Love it when that warm gulf air meets a northern cold front. We've strolled the beaches, hunkered down a bit and I've been doing what I call "non-productive" work. That is work that generally doesn't generate income. These efforts include volunteer effort, blogging, reading financial and retirement articles, and doing business overhead matters. Never a dull moment.

The cooler weather has been pleasant, but with it the humidity has increased dramatically. The mosquitoes love this. We find that walking along the lake is a great escape, as the westerly breezes blow the little suckers inland. At the beach there is a bug free zone and those that do migrate toward the shore are tasty treats for the many swallows who constantly clean up the skies. At the pond we have dragonflies who carry out the same duties. In the past week I think I got one bite, which really isn't all that bad. We haven't had to use repellent yet this year.

Most of my internet related work is accomplished using a Verizon jetpack. It is not uncommon for campground internet to be intermittent. We've discovered this all over the U.S. So we use it when available and if it isn't, then out comes the jetpack. The jetpack is how I'm able to do this blog, upload videos, etc. If not for it, I'd be limited to email.  In fact, yesterday I edited and uploaded the HOA newsletter. Not possible if not for the jetpack.

Walking at a nearby beach.
The Roadtrek 210P

A sailboat was the only recreational vehicle in sight on the water

We also visited a nearby state park and it too was quiet. But there are always a few who simply come here to relax.


Overcast at the shore:

Moby turtle was cruising the pond:


The weather got wetter:

This mornrng's rain
Recent rainfall totals
Original material:  https://roadtrek210.blogspot.com/


Sunday, June 17, 2018

Lake Michigan Shore Winefest


Bookmark and Share


We attended the winefest with friends. Hot and sunny. Nice breeze off of the Lake. Good music, too. Here's a short video:


Original material:  https://roadtrek210.blogspot.com/

Sunday, May 27, 2018

Chicago River Tour - Metra Train


Bookmark and Share


If you get to Chicago take one of the Chicago River boat tours. My favorite is the Architectural tour, which is available during daylight hours and also at night. At night there are all of the lights of the buildings to admire, too.  Getting into the city and to the river can be a traffic and parking issue, which is why we take the Metra train into the city. City parking is expensive and at times non-existent. The City has put parking meters on just about every street that can bring in revenue.

The Chicago area has an extensive commuter Metra train system which extends into and beyond the nearby suburbs. On weekends a "Weekend Pass" is good for unlimited rides on all Metra lines. As of May 2018 cost for a pass is $10.  For the Memorial Day weekend the pass was good for three days, 5/26, 27, 28!

Travel to and from other communities to Chicago's Union Station via Amtrak is also possible. For example, St. Joseph/Benton Harbor MI via Amtrak  to Chicago is $46 round trip, plus any taxes per adult. Seniors and children get a discount.

On Memorial Day weekend travel into big cities can be challenging. For example, on Memorial Day weekend rather than drive an RV or car, a train ride can be preferable. No parking or traffic issues, etc. That's the method that was used for the holiday weekend to enjoy the river boat tour:


Metra Weekend Ticket - A Bargain!

Note: River photos by G and friends.


Original material:  https://roadtrek210.blogspot.com/