7 Pages are shown on the Main Page.

7 pages are shown on the Main Page. To see additional posts, click on the link "Older Posts" at the bottom of the main page. For videos go to https://www.youtube.com/@normanretzke4377/videos click "skip" to avoid ads


G has a "swell" time kayaking

G has a "swell" time kayaking
G has a "swell" time on Lake Michigan in an inflatable canoe

Dawn on the Gulf of Mexico

Dawn on the Gulf of Mexico

Warren Dunes Sunset

Warren Dunes Sunset
Warren Dunes Sunset
Showing posts with label Dealing With Cold Weather. Show all posts

Saturday, December 24, 2022

Portable and stationary supplemental heat


Early morning coffee in an all-electric Class B

Bookmark and Share

We've found that adding supplemental, portable heat to our RVs adds greatly to our cool and cold weather comfort. Our first trekking experience was in an all-electric Class B RV.  It had all the whiz-bang stuff including solar panels and lots of batteries. That fall camping experience taught us the limitations of 30A of electricity and the limitations of relying solely upon electrical appliances.

We do camp during 3-1/2 seasons of the year.   Our lowest overnight temperature experience was about 5F, with other nights as low as 20-35F.  

An overnight stay off the grid at 20F - just about to leave for the day

We've found methods to supplement the built-in heat sources in our RVs and create a more pleasant experience.  I should add that having a backup heat source is helpful in cold weather. In the Roadtrek we could run the engine in an emergency, but I won't do that to heat the coach in cold weather.

Rise and shine at 9F

One thing to bear in mind is that these RVs have little insulation and a lot of glass area. Glass has an insulating, or R-value of just about zero. Single pane glass keeps the elements out, but that's about all.  There are exceptions, but we don't have double pane windows and the Roadtrek 210P has very little insulation. Because of this our RVs can get quite cold when the outside temperature is below freezing. We selectively use Reflectix on the windows and floor carpets as aids, especially in the Roadtrek. We also use an electric blanket.

I also added a floor heater pad.

One thing we learned in the all-electric coach we rented was that 30A goes only so far.  Add up the requirements of the charger-inverter (at night), an electric cook top, a hot water heater and a 1500W space heater and something has to give.  In cold weather (20F) it provided an above ground camping experience and to cook we had to turn off the hot water heater and space heater. (see 6am photo above).

Because of that experience, today all of our RVs are dual fuel.  Propane and electricity (12VDC/120VAC) and the Roadtrek has a generator, too. In fact, if I had my preference all of the water heaters would be dual fuel propane/electric, but that isn't the case with the Roadtrek, which is only propane. Why this preference? Primarily to conserve propane so it is available for the hot water heater and for the furnace. 

In the Roadtrek we are more cautious about energy expenditure and we do our best to conserve propane, which is a necessity for the hot water heater, furnace and range top.  If we want hot water we must have propane or heat a bowl in the microwave. 

Other electric heat sources include the heat pump down to about 40F. For cooking with electricity we also carry a portable electric stovetop burner and inductive burner,  Works well with cast iron.   Another reason for the electric burner is to minimize water vapor inside the Roadtrek.  Burning propane releases H2O into the interior. This moisture is added to that we exhale with each breath and readily collects on cold surfaces, such as windows.  We do use Reflectix to minimize this. 

Condensation has not been a problem for us.

One thing about a Class B is that side door.  Open it for egress and one allows much of the interior heat to escape, and winter in.

We carry a small 750-1500W electric heater in the Roadtrek.  This puts heat in the front of the van and reduces the reliance on the propane furnace.  We use it primarily at night and in the morning, and direct heat to the rear.

Portable heater for the Roadtrek

Other heaters for the lily pads

Our MI lily pad is a 30 ft. travel trailer with 30A electric service.    It is equipped with a propane furnace, dual-fuel hot water heater and dual-fuel refrigerator. I've added a portable 1500W adjustable heater with digital thermostat and an electric blanket.  The heater is at the rear of the RV and is usually set at 65F.  If it is chilly in the morning, I'll increase the setting to 70F or so. We may be at the campground from May to October, and both May and October can be cool and damp.


30 ft. travel trailer in MI

At the 5th wheel in AZ we have a built-in heat pump and propane furnace.  We use the heat pump for temperatures down to 40F and then switch to propane.  Winter nighttime temperatures can be as low as 25F at the extreme.  A  few nights in January the low is 35F.  However, early cold snaps can occur as did in December 2022 with nighttime lows of about 35. With full sun daytime temperatures peak at about 65F-75F.

Our Arizona "lily pad"

The 5th wheel is about 42 ft long and I've added several portable heaters.  The main living space has a radiator style heater. The ceiling fan helps to distribute the heat.  This type of heater is available in various sizes/wattages.


I've also added two 250W resistance heat panels.  These include off-on switches.  To control each panel I added a LUX thermostat.  One heater is hung in the bedroom and the other is in the bunk room.  These are for supplemental heat.  I've found that using them reduces the use of the propane furnace while making the RV a more even temperature throughout. I've measured the surface temperature of the panels and it is 161F when these panels are "on" and up to temperature.   

I've hung these panels, as I did not want to drill holes in the walls.  

Electric heat panel


Thermostat to control the heat panel


We added a 20 inch x 60 inch heating pad to the Roadtrek. This covers the floor area in the center space.  I initially set it up in the 5th wheel, and when we are there, we use it in the living space. It is 120V, 300W and because the surface temperature can reach 125F.  I added a control to reduce the surface temperature. G really like it. 

20 x 60 inch heating pad - photo in 5th wheel
currently in the Roadtrek main area


How much to we spend on electricity? Monthly electric bills vary depending upon the weather and how much grilling we do, and we do a lot. We do have two refrigerators. There is an air conditioner in the shed. We use waterless cookware and cast iron on an electric cook-top and we have a weber electric grill.  In February 2022 our electric bill for the previous month (January) was about $126. Over the span of a season, I'll use about 1-1/2 30 lb. propane cylinders.  These were about $25 to fill. This year filling each is about $32. Electricity is more costly, too.

I have a kill-a-watt meter which I use to check the actual wattage consumed by appliances.  I also have a non-contact thermometer which is useful for determining surface temperature of RV walls, floors and the surface temperature of heaters.

This year I purchased water testers for pH and TDS.  The set including batteries was $14.10 delivered. These allow me to check the water softener and the quality of the fresh water when travelling.  These testers are useless for microorganisms and poisons, so I only use them on water that has been declared to be potable.  It is a means for quality assurance.

Kill-a-watt meter

Non-contact thermometer - seasoning cast iron

pH and TDS testers


(c) 2022 N. Retzke

Sunday, March 28, 2021

Cold Weather - Reducing RV Condensation

Reflectix in the windows


 Bookmark and Share
 
With the departure of Winter and arrival of Spring we will continue to experience cool to cold nights.  To reduce heat loss at night and improve comfort there are some things we can do. A side effect of cold outdoors is condensation on windows. We have trekked and camped overnight down to near 0 F with minimal or no condensation issues. Here's how we avoided or minimized condensation.

Most condensation in our Roadtrek occurs on the glass surfaces. Class B RVs have a lot of single pane glass windows, which have almost no insulating properties. I understand the R-value is about 0.1.  For comparison, the R-value of a sticks and bricks house with 3-1/2" fiberglass batting in the walls is about 14 if the total wall construction is included in the rating.

Without getting into all of the science, the condensation occurs when the humidity in the interior of the RV is above the dew point temperature of the glass windows or other cool-cold surfaces. Normal comfort humidity in winter and cold spring nights will be above the temperature of single pane glass window and condensation will occur. That condensation may freeze on the windows, or just drip.....

In the winter the problem we have is adding moisture to the air inside the RV.  Cold surfaces condense moisture that is in the air. IMHO the solution is:

  1. Reduce the moisture released into the air in the RV,
  2. Improve the insulation on cold surfaces and the primary offender is glass windows which have almost no insulating properties,
  3. Vent excess moisture via a fan, but that also vents heat, so it is my approach of last resort. 
Where does that moisture come from? When we exhale our breath adds moisture. So does cooking if steam is released, and burning propane on that stovetop does the same (a byproduct of burning propane is water vapor).

To reduce moisture release into the interior of the Roadtrek I don't use the stove top which uses propane. There is an added bonus as I then conserve propane for the hot water heater and the furnace.  

I use alternative electrical resources for cooking and avoid using propane; I add insulation:
  1. For cooking, I use the convection/microwave and an induction portable electric burner with cast iron skillets, etc. When cooking I keep a lid on it to reduce moisture release into the RV.
  2. For boiling water we prefer the microwave.  It heats faster and releases less water vapor into the air. 
  3. I add insulation to the windows. I use pre-cut sheets of "Reflectix" on all of the windows. This not only reduces condensation it makes the van more comfortable. It is possible to use two thicknesses of Reflectix in the sleeping area. When travelling in winter we roll up the cut sheets and store under the bed. 
  4. As a last resort I use the rooftop vent fan to vent moisture laden air. However, I avoid that because it not only vents moisture, it sends that warm air into the outside. That warmed air is replaced by cold outside air which gets in via door seals, etc.  That cold air needs to be heated with energy.

We have done the above at temperatures near zero F and we generally don't have winter condensation issues....

  Original material http://roadtrek210.blogspot.com/


Friday, October 13, 2017

Adding heat to the RV


Bookmark and Share


With cool and cold weather trekking in mind we've added some additional sources of heat to our rigs. This has worked well for us.  Our 210P includes a heat pump and a propane furnace. These work very well, but we wanted to add things to work below the 40F lower limit of the heat pump and supplement the propane furnace. We do conserve propane.

Here's the stuff to supplement the built in heat:

  • Ceramic hot air heater 750/1500 watt, electric.
  • Circulating fan, 12V.
  • Electric blanket, dual control.
  • Electric wall mount heater, 250 watt and Digital Thermostat (evaluated)
  • Floor heat - considered but not installed

The Ceramic heater. Has a built in non-digital thermostat. Works well in the small space of the Roadtrek and we also use this to load the Onan generator in cool weather for the monthly 2-hour run. There is also a version available with a rotating, motorized base. That's the one we have, but we usually point it in one direction.


Circulating fan, 12V. This doesn't add heat, but it does help to mix the air in the Roadtrek. Generally the very front of the RV is cooler than the rear because of that large expanse of windshield glass. We do cover the windows with Reflectix.  The fan fits well in the tray above the side entry door. It has side air inlets.


Electric Blanket. We purchases a king size "plush" dual control with 10 heat settings (including prewarm and low). G loves it. Got ours at Sam's Club on a special price. We like the illuminated settings, makes it easy to find the controllers in the dark.  Ours is a beige Homes Sunbeam, similar to the photo.
Holmes Sunbeam dual control King blanket

Electric wall mount heater with digital thermostat. This was evaluated last year in our larger rig. The bedroom in the 5th wheel is about the same volume as the Roadtrek. I suspended a 400 watt radiant panel in the bedroom last winter and controlled it via a digital thermostat. It actually provided too much heat. I was also concerned by the high surface temperature. I have since found a similar unit which uses about half the power and therefore puts out less heat. It is a 250 watt unit. That seems about right for the Roadtrek

We used the 250 watt in our 3rd rig this spring. Works very well and with lower surface temperature.

I'm thinking of suspending (hanging) it in the front of the Roadtrek at night. Because it radiates heat both front and rear, that should dramatically improve the front temperature. At 250 watts, it is 1/3 the heat output of the ceramic heater, and would reduce energy requirements. I'd stage these so the panel thermostat comes on first. If the interior temperature of the Roadtrek continues to fall, then the ceramic 750 watt heater would come on (low setting). If even lower, the propane furnace would run.


Floor Heat Pad. This is something I've considered, but not yet done. We currently have a heavy duty carpet on the floor of the RT, which is about 78 inches long x 34 inches wide. This covers the entire galley floor area. One option is to add a foot warmer. Cozy products has a 135 watt electric floor mat. It is about 17 x 38 inches.

Cozy Products FWB Super Foot Warmer


So there are our current approaches and a floor heat possibility we are considering. 

Hope you have pleasant cool and cold weather trekking experiences. My next post will look more closely at comfort factors for cool and cold weather trekking.

Friday, February 27, 2015

RV Trekking when the temperatures drop


Bookmark and Share


Updated after some reflection. See the comment at the end of this post. This post isn't about summer in Yosemite. This dragonfly is on the masthead accompanying this post. However, this particular post is about winter.


I think we've enjoyed our winter treks, during which temperature ranges we experienced while living in our camper van were from 2F to 79F. That's quite a difference and being prepared for this is essential. On our first experience in a RV we encountered fall nighttime temperatures of 20F. That experience gave us some first hand knowledge about cold weather comfort in an all-electric RV (solar/batteries/shore power). Our first winter trek was in early December, 2013 and we left for warmer climes in a stock RT with blankets, a 1500 watt supplemental electric heater and a roll of Reflectix. We learned a lot on that trek and we've applied what we have learned. This January we were much more comfortable during our second winter trek.
December 2013 - First Winter Trek

This isn't one of those posts about the joys of living in my RV and off the grid when the outside temperature outside is 20F or lower. Nor am I going to post about how we should get arctic gear and a balaclava to help us get through our winter RVing experience. If you are doing that, then I am sure you are practicing all the tips in this blog and more.

Yes, it is possible to RV in really nasty winter conditions. I've also ground camped at temperatures down to -25F and experienced and worked in temperatures to -65F wind chills. This blog is not about winter survival RVing. I do want to travel in comfort and I do want to be prepared for problems and issues. My spouse is most appreciative.

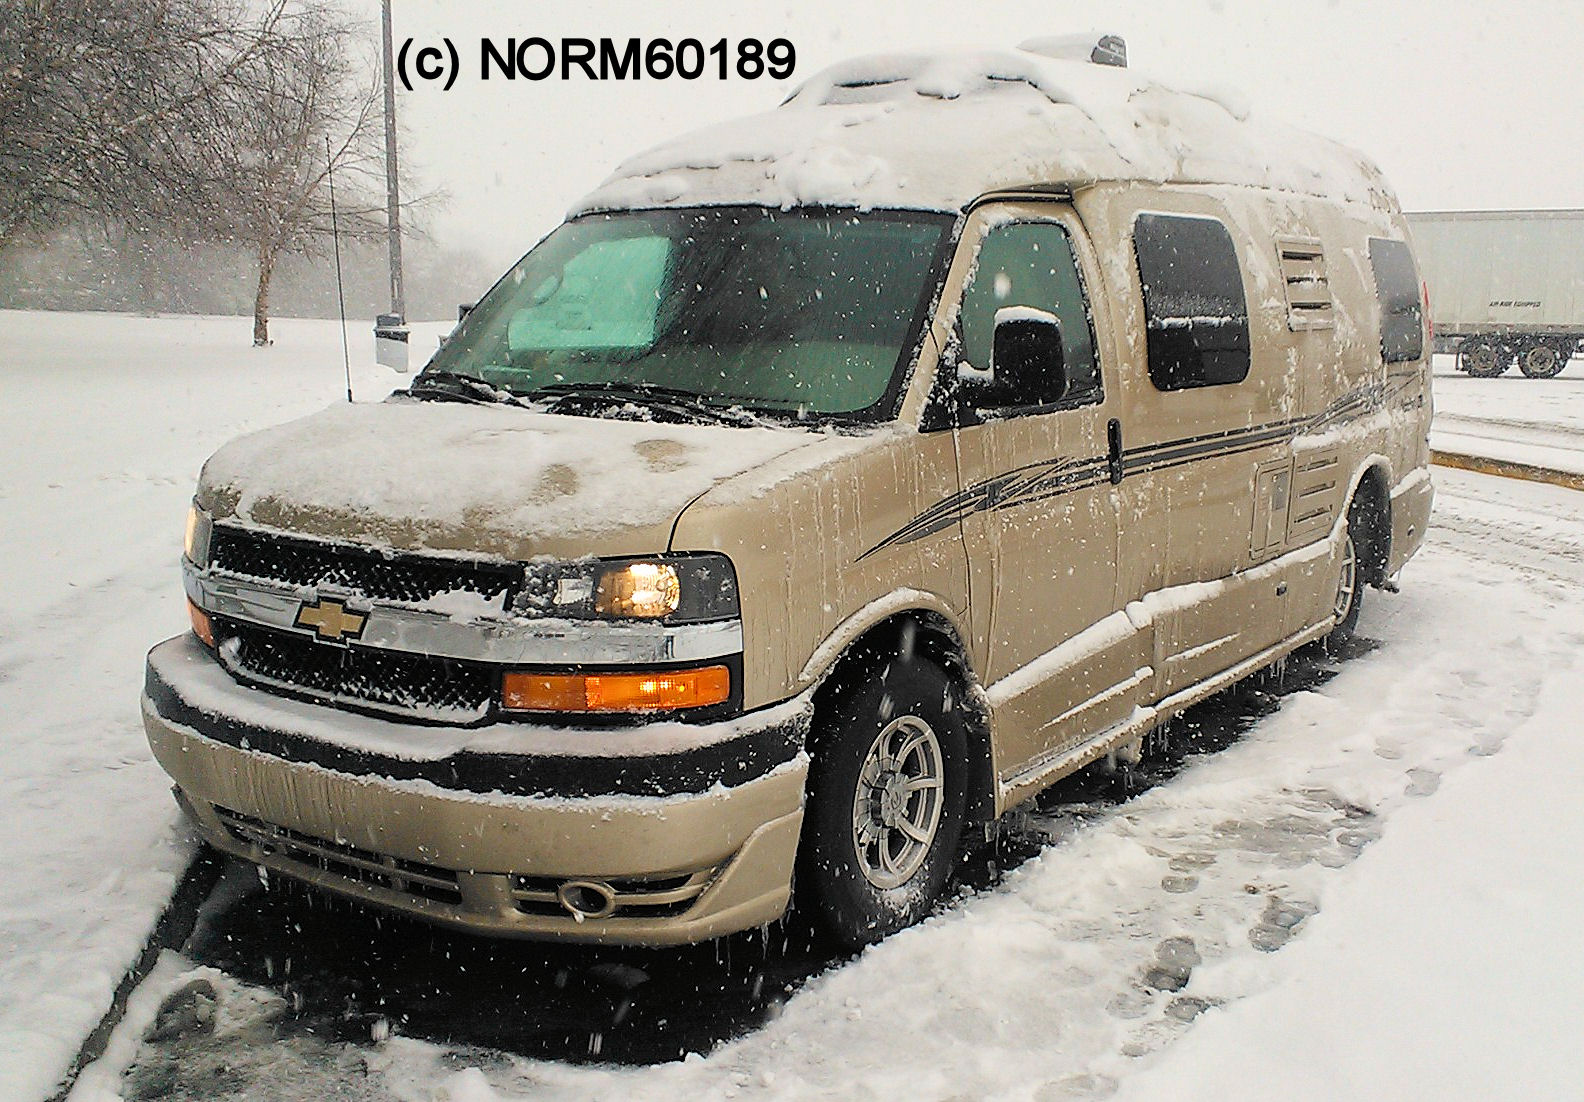
Almost Ready to Roll, 9 F at 7:30am

Let's be real, shall we. Many RVers use their home on wheels during the winter months for the purpose of escaping the ravages of winter. That is, after all, one of the reasons to have a home on wheels; we can get away! Others use them only in the fall, summer and in spring. When the climate gets ugly, we simply retreat to our wooden homes, or if in the RV, we move a few hundred miles and choose a better (warmer) location. There are numerous personal RV websites out there and you may notice some authors spend a lot of time during the winter travelling west to east, from San Diego, California to Florida and back. That's with good reason. It's to keep above 45F. However, if we travel anytime other than summer or more extensively northward we will each eventually encounter cold weather and we'll have to deal with below freezing temperatures. That is what this particular post is about. There are things we can do to be prepared and to make winter cold weather RVing more enjoyable.

These are my experiences as a RV newbie and some tips. I call them "rules" but you might prefer "aids" or "tips."

Now, if you are reading this from an all solar RV in southern Arizona, then this blog isn't for you. This post is provided to share my experiences in a small RV which has propane and gasoline generator when disconnected from "shore power" and two 6V AGM batteries. During the winter months if we are in our RV,  we spend most of our time connected to shore power, unless we are in movement, and we move frequently. We have not yet stayed in one location more than 10 days. We chose this particular RV because we wanted the ability to experience true 3.5 season RVing from Michigan to Arizona and with few restrictions. If you are of similar interest, then this post is for you.

We prefer to travel when the temperatures are above freezing during the daylight hours. However, nature doesn't always agree with our desires and nor does our schedule. In January we took a trek and escaped most of the cold weather here in the Northland. But darn, a more southerly storm from the west coast brought snow and cold. The nighttime temperature in Roswell, NM fell to 5F. That was an inconvenience as I had to re-winterize the RT before the temperatures dropped. (I recorded a low of 2F that night and early morning).

There are a lot of things to be said about this, but the primary issues are to have adequate fuel, be prepared and have what it takes for comfort. Our personalized and improved Roadtrek 210P has what it takes.

Rule #1:  Be very familiar with your RV's winterization requirement and winter limitations. I can't stress this enough. Be prepared to dump tanks, add anti-freeze and so on if you are trekking anywhere that below freezing weather is even a remote possibility, Yes, one or more of your fresh water tanks may be in a heated area. But what do you do if the heat fails? I recommend we be prepared. We've had a propane regulator failure, twitchy AGM batteries and a generator that didn't want to start (after some coaxing and patience it did start).

Rule #2. If travelling in the winter, spring or fall, be prepared for freezing weather.

During our January trek, we began at 30F and became complacent when daytime temperatures reached 50F. However, a winter storm dropped temperatures in the Roswell, NM area to 2F.  We had blankets for sleeping and a supplemental electric heater and full propane for the furnace, so we were adequately warm at night. We also had winter clothing and an adequate supply of "pink" antifreeze. So, the weather was merely an inconvenience and not a problem. After all, most of us trekkers have to deal with such low temperatures only for a day or two. In Roswell, the temperature soon peaked at 61F!

Rule #3: When travelling in the winter, spring or fall, take along a couple of gallon jugs of drinking water and keep this inside and warm. We use this when we travel with winterized tanks. In other words, this might be the only drinking water available. Of course, you can use the toilet if you flush with pink anti-freeze, and we do that rather than getting out of the RV in the night to use the nearby toilet facilities, if there are any.

Rule #4: Take a supply of potable water system antifreeze and be aware of how to winterize your RV. We had done the above and so the re-application of anti freeze on a recent trek was simply an inconvenience.  As the temperature plummeted we dumped the gray and black water tanks, emptied the outside fresh water tank and simply added about a gallon of "pink" antifreeze to the outside fresh water tank. We then pumped it through the system and added some to the P-traps and toilet. It took about 30 minutes. This would have been a major problem had we not packed two gallons of anti-freeze. That is one of the reasons I consider our 210P to be the personal minimum space for two. We had the room for that anti-freeze, and all of our other gear and firewood and BBQ, too!

Rule #5: Know your RV. We travel with a copy of all of the manuals for our RV, and that includes the furnace, macerator and convection oven. I made it a point to check the model numbers of everything by looking at the plates on the equipment. Do you know which specific model battery separator your RV has? Or toilet? Or inverter? When things go wrong, that information is invaluable when you call on your cellphone for help.

Rule #6: Make certain your propane tanks are full before any trek.  We had done that. So when the outside temperatures dropped, we used the portable electric heater but also set the propane furnace at 65F, in the event interior temperatures fell or the electric heater could not keep up.  We were toasty throughout the night. Why have a home and live as if it is a cave?

Rule #7: RVs are metal cans and are not sealed to be airtight. (Mine is fiberglass shell and steel body). Most have single pane windows. In other words, if the insulation is R4.5 you are doing well; but those windows have an R value of about 0.91 (useless insulating value). In layman's terms, you will probably experience drafts and cold zones at night.

To be comfortable at lower temperatures we decided we needed to do a few things to improve the vehicle comfort.  Some of these are useful in higher temperatures, too.

Rule #8: Insulate your windows. We use aluminized bubble wrap insulation on our windows (Reflectix) and that makes quite a difference in both low and high temperature extremes. I cut the pieces to fit and roll them up and store them under the electric sofa bed when not in use.  I always put the window insulation in place in the coach area at night if the outside temperature is to stray very far from a mild 70F.  If it is mild, I may skip the front (driving) area. Single pane windows, with Reflextix have an R-value of about 2.0, which is about double the insulating properties of glass.

Tip: for extra comfort in the sleeping area use two layers of insulation on the rear windows.

Rule #9: Sleep warm and comfortable. If you have a good, restful sleep you will have a better day. We've used a variety of sleep aids including polartec fleece blankets and wool, but an electric blanket is probably the best when temperatures fall.  When I sleep at home I sleep in a bed with blankets. I don't sleep in a sleeping bag. That's what I expect when I sleep in my RV; a bed with blankets and that's what we do. We have a king sized bed in our 210P and we enjoy it. The sleeping bag I store with my tent.

We experimented with a small heating pad and liked it. So we now have a queen sized electric blanket. We set it at the lowest setting. With good blankets that is sufficient. The electric blanket is really helpful for anyone with arthritis.

Our electric blanket has independent dual controls with 10 heat settings each. It's a queen size and at the lowest setting uses 110watts per side. That's per my Kill-a-Watt P3.

We've found the lowest setting on the blanket "L" to be more than sufficient. If you want a boost, select the "preheat" feature to get your nest nice and toasty before entering for the sleep.

With an electric blanket I suspect we'll probably use less electrical power. I am also experimenting with a 12V fan to get better airflow in the sleeping area.

Rule #10: If you want that gasoline generator to start, keep it maintained and use a gasoline additive. I do run ours monthly and I add SeaFoam motor treatment additive regularly so as to be assured that the carburetor of the generator has additive in it. When we are travelling from point A to point B I see no reason to add an additive with each tank of gas. So I carry a 1 liter bottle in an outside compartment and add it to the last tank of gas for our trek. We begin the trek with additive in the tank and we end it with additive in the tank. I run the generator at the end of the trek to assure that there is additive in the carburetor. To save money, I purchase the additive in a gallon container at an auto parts store and transfer it to the smaller 1 liter container. I have used less than a gallon in 12 months.

This tip could also be entitled "Keep your RV maintained." If I want the generator and other systems to perform on demand that is a must. This is also why I am committed to replacing the AGM batteries.

Rule #11: Smaller is better, in my opinion. Many won't drive a larger RV through winter storms; I've never done that, but I have driven this RT in snow and ice. I've also driven a truck in bad weather and so I have an appreciation of the concerns of the Class A driver. It wasn't fun  but there was a deadline and I did need to be at the destination on time. For RV trekkers, that is not a paramount consideration and one can park the RV and ride out the winter storm. We did that for part of our first winter trek. We drove as long as possible to get beyond most of the storm, found a nice overnight spot and fired up the generator and propane heater. We were able to continue on our way the next morning and I have found that a rear drive "van" is reasonable and comfortable in many weather conditions. I also prefer the small, side entry door for entering the living space. Really wonderful for quick entry or exit in winter. We did rent a Sprinter and that large sliding door is enjoyable for admitting the outdoors when the sun is shining and it is mild. It sucks in rain, sleet, snow and when it is really, really cold outdoors.

It's useful to keep in mind that each time one opens that living space door, one lets all the heat out and in comes the cold, rain and snow.  The front passenger seat has been rotated when we are stationary and climbing over front seats with boots, etc. is simply not a good idea. That's my experience. It hit home when we rented a Sprinter. Yes, during those wonderful, mild and bug-free days we enjoyed that sliding door. But overall, we really prefer the smaller, easy open side entry door of the Chevy van.

Sprinter and the Outdoors
RT210P - Smaller side entry

There are other things one can do, and I could make an endless list. However, there are things we do that really make a difference and the above I consider most important. 

Comment: Our first winter trek was a spur of the moment decision. We quickly packed clothes, canned goods, boots, cold weather gear, kitchen stuff, tools, antifreeze, water, a VOM and duct tape, Goop, scotch tape, a white and black paint marker, 12V battery charger and so on. We really had enough stuff and the only thing we needed to purchase besides gasoline was a roll of teflon tape for the hot water heater anode. But, we have learned more about comfort and what it takes to be both confident and comfortable on our treks. Perhaps I'm a Murphy's Law buff. But in my business that is what it takes. I prefer to have more data on how the camper van systems are doing, and I also like to pack for breakdowns. So I've begun to improve the instrumentation on the internal systems of the camper van. The RT 210P is pretty good, but for example, adding internal, external and refrigerator temperature sensors is an aid. Ditto for better power monitoring (AC volts, current draw, frequency) and that includes a desire for better condition monitoring of the coach batteries. I haven't really spent much money doing this (less than 1% additional as compared to the original purchase price), but it really builds one's confidence when camping in very cold weather. My spouse who is somewhat skeptical now enjoys our treks with significantly less trepidation than she did that first one. Alaska, here we come!