7 Pages are shown on the Main Page.

7 pages are shown on the Main Page. To see additional posts, click on the link "Older Posts" at the bottom of the main page. For videos go to https://www.youtube.com/@normanretzke4377/videos click "skip" to avoid ads


G has a "swell" time kayaking

G has a "swell" time kayaking
G has a "swell" time on Lake Michigan in an inflatable canoe

Dawn on the Gulf of Mexico

Dawn on the Gulf of Mexico

Warren Dunes Sunset

Warren Dunes Sunset
Warren Dunes Sunset

Saturday, October 21, 2017

Trekking in the Fall with Winter coming


Bookmark and Share


Update October 21, 2017:
Over at FB I commented "My 2013 210P has two fresh water tanks and 2 gallons of RV antifreeze is enough. I rinse and drain the gray and black tanks multiple times, until clear. Then I drain the fresh water system as well as I can. I completely drain and rinse the hot water heater, then reinstall the anode. I then bypass the water heater. Then I add antifreeze to both fresh water tanks as recommended by Roadtrek in their 2015 210P "How To" manual section. I then follow the recommendations per the manual to pump the antifreeze throughout the fresh water system. However, once water no longer exits the spigots I catch the antifreeze in a bucket. That I save to add to the P-traps including the gray tank and also to the toilet. Works well for me."  One thing I do sometimes forget to do is to run the macerator after I've put antifreeze in the gray tank. That pushes the water out of the macerator and hose. However, I've never had a problem with the macerator. That may be because I carry a spare with me.

I have found the "How To" section in the 2015 210P manual to be very helpful. This is an updated manual which is available at the Roadtrek website. It can be found in the "Support" section.

For that reason, I suggest going to the Roadtrek source for information.


Original Posted September 23, 2017:
Over at Facebook some of the groups are now going back and forth about the necessity or not of winterizing a Class B, etc. in anticipation of below freezing travel.  Some seem to think that they can trek and beat the weather if it turns. Is winterizing necessary? I've included some additional info from the Roadtrek manual for a 210P at the end of this post. However, Roadtrek's online 210P 2016 manual states:

"Do you really need to winterize? If your Roadtrek is going to remain heated to comfortable temperatures, and the temperatures during the day are well above freezing (above 40 deg. F or above 4 deg. C) and the forecast is for temperatures just below freezing for a few hours at night with calm winds, then you don`t need to winterize. The heat in your Roadtrek is enough to keep the lines from freezing.

If the forecast is for extended cold periods, with daytime temperatures at or below freezing, if you`re not heating your Roadtrek, or if you expect sustained winds and the roads and ground is already frozen, you need to winterize.

As always, you are final judge and you need to do what is comfortable and makes you feel good. If you are not comfortable with leaving water in your lines when it gets cold, and you will sleep better, go ahead and winterize."

Here's a couple of our experiences.

The current chatter at FB could have been triggered by the reality of snow in Montana last week. Or perhaps just cooler weather in places like Bryce Canyon National Park, where the weather tonight will dip to 22F.

I chuckle when some say "I'll be travelling on I-10 and no one that far south needs to be concerned about freezing weather". Here's a photo taken by a work associate in New Orleans a few years ago, on December 10. Yes, that's a small snowman photographed in a mini-blizzard:
Making a snowman in New Orleans

Back in Northern IL it hit 98F at home today, where the heat index was 101F. In Tucson, AZ it is 84F! Where we are today it is currently 85F, with a breeze coming in from the lake. There is a big bike race tomorrow.

At the beach 11:00am
The weather will soon change. When it does there will a lot of discussion about "winterizing."

This is the time to figure it out. When the temperature drops below 25F it will be too late. You don't want to be in that predicament, do you?

Trekking through southern Indiana a few years ago on December 7 we encountered bad weather, as shown in the next photo. Yes, that is snow and ice. We did camp overnight, but with winterized tanks. We ran the propane furnace then switched to electric ceramic heater and the generator. We carry several jugs of water, 1.5 gallons or 2 gallons each. We also carry three gallons of pink RV antifreeze, even if we are already winterized. Here was the situation in Indiana on the morning of  December 8:


The following year we left Illinois in January during a warm trend. In Missouri it was about 50F and we spent the night in a RV park in Tulsa, OK. It was mild and we had water in the fresh water tanks. But there was a fast moving storm coming out of the west. We left early in the morning with temperature expected to reach 55F but by the time we got to Texas the temperature had dropped to a high for the day of 44F. As the winter storm approached the temperature continued to fall. We were headed toward Roswell NM and the weather updates changed the low to a much lower nighttime temperature. How low? The temperatures were predicted to go below 20F that night. On that trek, because it had been predicted that temperatures would be well above freezing during the day, but not below about 30F at night, we decided we didn't need to winterize. The weather did not cooperate. Now we were faced with a dilemma.

Well, en route and in the middle of the day we stopped to dump both fresh water tanks which were about 1/3 full. I left the outside tank drain valve open and allowed any water in the lines to trickle from the inside tank to the outside one and then onto the road. We stopped at a gas station as dusk approached. At that station we winterized right then and there, using the pink RV antifreeze I brought with me, and the funnel. There was blowing snow as we continued our journey.


By the time we got to Roswell it was dark and snowing with a lot of standing water in the town, from a downpour earlier in the day, when it was 50F. I drove into the RV park where we had a reservation (don't travel without it!); there were no sites available. Our reservation was the only thing that got us in, as RVers scrambled to find places with electric hook-ups to ride out the storm. I parked and hooked up the electrical. I didn't bother to hook up fresh water or the macerator hose. We powered everything up and had a good dinner. Afterwards we settled down for the night, using the electric ceramic heater we bring with us (750/1500 watt) and if necessary we run the propane furnace. Yes, I do fill the propane tank before any of these treks. Because of our winter seasonal experiences we have since added a dual control electric blanket. Now that's toasty warm!

We got up before dawn so we could have a nice breakfast before continuing on our journey.  The storm had blown out and the really cold front had blown in. Sunrise was at 6:59am.

Dawn at 9F
While cooking breakfast I checked the weather and our inside/outside temperature display.  The temperature inside an outside storage compartment was about 6F warmer than outside ambient.


Inside temperature and in one of the rear outside compartments (clock on CST)

The 30 ampere power cord was stiff with cold, making coiling difficult. As we left the town we encountered a winter wonderland. The standing water had frozen solid with a layer of snow on top:

With the sun rising, we left Roswell, NM and headed west, southwest:


Three hours later we were still driving through a frozen countryside, en route to Las Cruces, NM:


When we approached Las Cruces, we finally reached the end of snowfall, but the temperature outside was below freezing:


Continuing on, we encountered snow on the ground at noon, and it wasn't until 2:00pm that we had finally left the snow behind us:


At 4:00PM we pulled into our destination. Temperatures were mild, in the 50s and with a low expected of 38F that night:


What does Roadtrek say about this?
I think it is important to follow the manufacturer's guidelines. If one fails to do so, then one can void warranties.

Roadtrek has manuals that are good. They even include "How To" sections.  My 210P is a bit more complex than some class Bs because it has two fresh water tanks. One is inside and the other is outside. Because of this arrangement, there are valves to select which tank is to be filled via city water and which is to be used. Roadtrek includes "summer" instructions which use the outside and inside tank, and also includes "winter" instructions in which the exterior tank is drained and isolated via valves. During "winter" operation only the interior fresh water tank is used.

Anyone can go to Roadtrek's website and download the manuals they are interested in, as well as the "How To" guides and run videos.

So what does Roadtrek say about winterizing a 210P?

The 2016 210P manual states that "In winter mode, remember that you need to keep the interior temperature at least 60 degrees F (15 C) by running the propane furnace or heat pump, and keep the water heater running. Also remember that the waste water tanks are not protected from freezing. If you use them, mix pink RV antifreeze with whatever you put down the drain 50/50. If you do not use them, drain and winterize the waste water system."

In HOWTO: Summer and Winter Mode the manual states:

"The 190 and 210 Popular models have the capability to operate in mildly sub-freezing conditions, provided the water system is properly configured. To better understand this it is best to know how the plumbing is configured. The diagrams below show how water is supplied in each mode. Solid triangles are closed valves; hollow triangles are open valves. [see diagrams in manual].

In summer mode, both fresh water tanks are in use. The interior tank is inside the vehicle and is filled via the gravity fill in the back door frame, and the exterior tank is below the vehicle, and filled via the gravity fill in the driver's door post. The water line between the two is open, so water flows from the higher interior tank to the lower exterior tank as the water pump draws water from the exterior tank. In winter mode, the line between the two tanks is closed, and the exterior tank is drained to prevent it from freezing. The outside shower water lines are closed and drained to prevent them from freezing, and the water pump draws water from the interior tank, which is protected from freezing by cabin heat. The hot water heater will also not freeze if left running. In this way, hot and cold running water continues to be supplied to the galley sink, toilet, and shower.

"Winter mode" and "winterized" are two different things. Winter mode protects the water in the system from mildly sub-freezing conditions as long as the Roadtrek is adequately heated and in use. If you plan extended stays in sub-freezing conditions or if you store your vehicle in freezing conditions, you must winterize to avoid damage to the water system. To prepare your vehicle for really cold weather, see HOW TO: Water System Winterizing • "

The 2016 210P manual includes photos, diagrams and detailed instructions. Of course, it makes sense to check the manual for your specific model and year. However, in 2014 Roadtrek made major improvements to their manuals. I have  combined the improved online manual with the one that came with my Roadtrek. That is because the manuals after 2013 provide more photos and expanded "How To" instructions. Of course, one does have to check the plumbing in their RT to determine if it matches a manual for a later model year.

The "How To" sections about the fresh plumbing include:
  • Summer and Winter Mode
  • Switching from Summer to Winter Mode
  • Switching from Winter to Summer Mode
  •  Water System Winterizing 


Friday, October 13, 2017

Adding heat to the RV


Bookmark and Share


With cool and cold weather trekking in mind we've added some additional sources of heat to our rigs. This has worked well for us.  Our 210P includes a heat pump and a propane furnace. These work very well, but we wanted to add things to work below the 40F lower limit of the heat pump and supplement the propane furnace. We do conserve propane.

Here's the stuff to supplement the built in heat:

  • Ceramic hot air heater 750/1500 watt, electric.
  • Circulating fan, 12V.
  • Electric blanket, dual control.
  • Electric wall mount heater, 250 watt and Digital Thermostat (evaluated)
  • Floor heat - considered but not installed

The Ceramic heater. Has a built in non-digital thermostat. Works well in the small space of the Roadtrek and we also use this to load the Onan generator in cool weather for the monthly 2-hour run. There is also a version available with a rotating, motorized base. That's the one we have, but we usually point it in one direction.


Circulating fan, 12V. This doesn't add heat, but it does help to mix the air in the Roadtrek. Generally the very front of the RV is cooler than the rear because of that large expanse of windshield glass. We do cover the windows with Reflectix.  The fan fits well in the tray above the side entry door. It has side air inlets.


Electric Blanket. We purchases a king size "plush" dual control with 10 heat settings (including prewarm and low). G loves it. Got ours at Sam's Club on a special price. We like the illuminated settings, makes it easy to find the controllers in the dark.  Ours is a beige Homes Sunbeam, similar to the photo.
Holmes Sunbeam dual control King blanket

Electric wall mount heater with digital thermostat. This was evaluated last year in our larger rig. The bedroom in the 5th wheel is about the same volume as the Roadtrek. I suspended a 400 watt radiant panel in the bedroom last winter and controlled it via a digital thermostat. It actually provided too much heat. I was also concerned by the high surface temperature. I have since found a similar unit which uses about half the power and therefore puts out less heat. It is a 250 watt unit. That seems about right for the Roadtrek

We used the 250 watt in our 3rd rig this spring. Works very well and with lower surface temperature.

I'm thinking of suspending (hanging) it in the front of the Roadtrek at night. Because it radiates heat both front and rear, that should dramatically improve the front temperature. At 250 watts, it is 1/3 the heat output of the ceramic heater, and would reduce energy requirements. I'd stage these so the panel thermostat comes on first. If the interior temperature of the Roadtrek continues to fall, then the ceramic 750 watt heater would come on (low setting). If even lower, the propane furnace would run.


Floor Heat Pad. This is something I've considered, but not yet done. We currently have a heavy duty carpet on the floor of the RT, which is about 78 inches long x 34 inches wide. This covers the entire galley floor area. One option is to add a foot warmer. Cozy products has a 135 watt electric floor mat. It is about 17 x 38 inches.

Cozy Products FWB Super Foot Warmer


So there are our current approaches and a floor heat possibility we are considering. 

Hope you have pleasant cool and cold weather trekking experiences. My next post will look more closely at comfort factors for cool and cold weather trekking.

Tuesday, October 10, 2017

Cormorant Migration


Bookmark and Share

It's the time of year that the annual migration south is underway. Monarch butterflies, cranes, canada geese and even cormorants are flying southward.


Fall, Monarchs and Nature


Bookmark and Share


We're currently on the eastern shore of Lake Michigan. The great annual Monarch butterfly migration continues. We enjoy watching the flutter by as we walk the shoreline. Some get perilously close to the water. Nature prevails. As I write this a nuthatch is working its way down the pine, about 5 feet away. With fall, there is some urgency as temperatures cool.


Some Monarchs don't make it


Tuesday, October 3, 2017

Working, Volunteering, Planning and Trekking


Bookmark and Share


This post is a summary of how I/we got to this point in our trekking. In our case it took years. Others might get to this point more rapidly and this post might be an aid in accomplishing that.  Later in the post there is some planning information.

Early Travels
For a good part of my life I decided to take "The Road Less Travelled" (Note 1). Since 2013 we've trekked 29,000 miles while working.  Prior to that I have driven all over the U.S. and parts of Canada. About 600,000 miles total, and hundreds of airline trips with destinations ending in cities, towns and villages. A lot of the driving was local, but an awful lot was long distance for business purposes. I've had mid- to long-term business stays in CA, NY, OK, IA, IN, MO, IL, AL, GA, LA, FL, MI, CT, UT, TX, PA, MD, OH, WY, WI, NE, SC and elsewhere, while driving or flying in between.  There were also business trips outside the U.S. and a few non-business, too.  I would work during the day and drive in the evening or at night.  I slept in the back of a car, in a truck or wherever. Froze at more than one rest stop.  I lived weeks and months in a variety of motels. Work was frequently 12-18 hour days, and frequently 6 or 7 days a week. At one time I got through this by saying "I'll sleep tomorrow".

No matter where I was, I always maintained a "home base" somewhere, so I had a place to hang my hat, a place I could call "home".  Sometimes there was family waiting for me, and sometimes not. While travelling I paid attention to the communities I was in. Not much sight seeing was possible, but I did visit State Parks, etc. when I could. I checked out the local places, diners, museums, etc. I got to know the locals, as we worked together.

In 2000 I began serious investigation into places in the U.S. I might like to live. My many business travels were very useful to me. There were observations made while on a lot of automobile and airline trips, mostly for business purposes. Then as of 2013 via RV to get a closer and longer look at the top choices from my list.

Home Bases
We used all of our travels after 2000 to investigate locations we would be interested in living for longer periods of time. We used our treks after 2013 to set up several "home bases" in the U.S. which will provide me and G with the life we want to live in retirement. I also used them to get to client locations, as well as do exploring for where we would like to live for the next 10 years. We have friends and family scattered from the Northwest to the Northeast, the Southeast and the Southwest. There is also a very large group in the midwest.  Trekking is a good way to visit. But that is not guaranteed. For example, in the spring of 2017 we headed from the Southwest to Florida to visit family and friends. That was a 2,000 mile trek, and we had arranged to stay in a campground in FL. This had been pre-arranged but on arrival the family in FL cancelled our visit. After a couple of days of hovering and enjoying the area, we trekked on to the Florida Keys and visited some wonderful friends.

Obviously, being flexible is helpful for a trekker.

Planning my "escape"
I began planning my "escape" from a life of work at the age of 55. At the time and I had some serious obligations, such as young adult children who were in their early 20s at the time. That meant I was dealing with the financial consequences of their college educations. All obtained their degrees at "out of state" schools, and one attended a private college. The costs were not trivial and they shared in the burden. With freedom to choose comes responsibility and obligations. 

So I first had to deal with my financial obligations.  

Another issue was my civic duty. "What's that?" you may ask. I've been a volunteer of one sort or another over the span of about 25 years. Currently, one of our home bases is a condominium.  I am a HOA unit owner, and these associations run with a board, which makes all of the critical decisions. I've been on such a board for 7 years. Not a hobby, I assure you. That association is 40 years old and spends about $1.3 million each year. 75% of that is on "maintenance". I have "worked" as a volunteer for up to 700 hours in a single year doing this (that was 2010-2011).

I used the period from 2001 to the present to develop a plan. Patience, I have been told, is a virtue.

Creating a portal to another world
If we choose to trek we'll need something to accomplish that in. In my experience, successful trekking requires a significant amount of planning and preparation. I've done a lot of backpacking and ground camping over the years, and so I approached trekking in a RV the same way.  We decided we wanted to be nearly "full time trekkers" and that upped the stakes a bit.

To go "full time" or "much of the time" requires a lot of logistics. One can travel continuously, or one can hop from one geographical area to another.  We chose to hop, and do a lot of exploring in between. That decision required that we determine what "base" areas we wanted to live in.

As I had never been in a RV but at a show, I had absolutely no practical experience. But then, I learned to camp as an adult and so I approached this as merely another learning exercise.

Establishing the Location of a Base or Bases
With a map, we drew a series of circles with 400 mile radiuses. The centers were locations we might choose to base or live for longer periods. These were chosen with several criteria:

  • Proximity to things we wanted to see or spend time visiting (400 miles distance max).
  • Weather. Moderate temperatures in winter or fall or summer (multiple base locations required).
  • Resources. Water is a necessity. 
  • Reasonable costs and stable communities in viable states. (Not CA, IL, or other financially strapped states or areas; avoid financial time bombs). 
  • Nice people. Rather a broad category, but in some areas we have found that attending even a diner can be a wonderful experience, while at others it isn't. Sometimes the staff would prefer to be elsewhere and makes it obvious. In fact, going to such places is a wonderful way to determine the mindset of the locals. Anywhere that doesn't want us is a place I choose not to be. 
Steps for Success
We decided we'd need to formulate a series of steps. Money is the grease or fuel for living, but it isn't the goal. We decided we really needed to focus on finances while developing our plan. Here is what we did, and it worked for us so it might work for others. So what are the steps?
  • Step 1
Develop a long term plan. If you think I'm a "just wing it" person, or that you can simply "wing it", then brace yourself for some real upsets. "Retiring early" or full time trekking may allow you to escape from today's "daily grind." But it won't solve the problems you will face 2, 5, 10 or further years into the future. 

IMHO retiring early requires some real planning, or perhaps winning the lottery.   I concluded that I could not retire early, and did not.
  • Step 2
Begin a budget, NOW. The longer you keep one the more you will know about your spending habits and what it actually takes to live. If you can, purchase Quicken and plug in all of your expenses, itemizing credit card expenses, debt (auto, credit card and mortgage). Track your current living expenses and develop a budget. You will also need one while trekking, so you might want to know how you are doing today and compare that to the future "plan".
  • Step 3
Consider a plan that will allow you to live "debt free". Using your budget information, determine how many months or years it will take to achieve this. Then use that time to develop your plan and to prepare for it.
  • Step 4
Live a life in balance. Consider living a life in moderation. That means balancing today's needs, wants and desires with those future expectations. Save rather than buy the toys. Drive that automobile a few years longer, etc.
  • Step 5
Focus on health. One's health is an important criteria. A healthy lifestyle is helpful. However, as we age we may find we lose abilities and our health will decline. We decided we'd have to do whatever it was we were interested in prior to the age of 85. We'll monitor and assess our abilities annually in "retirement" and that will determine the future. However, health issues do occur. Include such things in your plans.
  • Step 6
Save significantly for retirement. Social Security was only designed to provide a portion of one's retirement financial needs. "Most financial advisors say you'll need about 70 percent of your pre-retirement earnings to comfortably maintain your pre-retirement standard of living." According to SS, if you have average earnings, your Social Security retirement benefits will replace only about 40 percent." " Most recipients receive between $700 and $1,800 per month in Social Security benefits." There is some evidence that future benefits may not be as generous as today's benefits. 
  • Step 7
Develop some idea of how you would like to live while trekking, and where. Where do you want to go? Where do you want to spend the majority of your time? Doing what?
  • Step 8
Try it. Rent an RV for a week or so. Rent something that you think you would like to own and trek in. Use it under the same conditions you think you would like to spend in your own RV. Learn from that experience.  Keep track of all of the costs.

  • Step 9
After trying a RV, review your plan. Adjust it if necessary.

  • Step 10 
Do additional long term planning.  Decide how much a RV may cost, and determine how much the lifestyle may cost, using the experience gained in Step 8.

Look seriously into the costs of food, gas or diesel, maintenance, health care, ownership insurance, entertaining, dining and so on.

Go online and pick a few places you would like to stay while trekking. Plug in the site rental costs. You may dream of boondocking, but that may not be a realistic lifestyle. We decided it could be a part of our trekking style, and it has been.

So how many days a year will you be trekking as in moving from place to place? Every day on the road uses gasoline or diesel and consumes a portion of the useful life of the engine and chassis of your rig.  The more you travel, the more fuel you will use. Travel also does consume the tires and accelerates the maintenance interval.

Take all of these numbers and determine your startup costs, annual costs, and add in a 15% "contingency".
  • Step 11  
You will now have sufficient information at your finger tips and the knowledge to execute the plan you develop.

Working in Retirement or while Trekking
If that is something you want to do, the I'd suggest looking into "workamping". There are ample online resources about this, including groups on social media. One of the issues of trekking is costs. Workamping provides the opportunity to stay in one location for a time; that means no gasoline or long distance travelling expense. It also provides the opportunity to explore an area. Finally, it may provide "free" rent and electricity while providing  free services and/or utilities in exchange for the services you provide. Do your own research into the benefits and problems of workamping and see if it might be for you.

I have not yet been a workamper. I've been fortunate that my skill set allows me to earn money while trekking in providing technical services and creative writing. We have discussed this and who knows, it could happen.

It's a big country and even larger continent
If you, like me, are interested in seeing a lot of this country, I think we Americans are fortunate. Lots of wonderful national and state parks, towns of all sizes and types, as well as big cities. A very large, geographically and culturally diverse country. Wonderful to trek in.

We've only trekked about 29,000 miles since December 2013. Less than four years of such trekking. But we've seen an incredible amount of the U.S.  That's because we "base" in certain locations and then travel from there. As a result, we spend a lot more time "seeing" things than travelling to things. It also reduces our actual travel costs. Less gasoline and less wear and tear on the Roadtrek, too.

Furthermore, many large cities have train service from the suburbs. Boston, Chicago and New York come to mind. I have travelled on the BART in San Francisco, but not recently. It is easy to spend some time on the outskirts and then take the train into the city for a long weekend.

In fact, Chicago Metra has a special "weekend pass" which is a wonderful bargain. $8 per person, special rate for children. I'm sure there are other special rates available in other cities. We've travelled by train in New York State, and Massachusetts.

A good Road Book
There are a lot of resources out there. One of my sons purchased a book which has a lot of good road information. I have the 6th Edition. The current edition is the 7th. I'll pass it along. This is a book "Covering more than 35,000 miles of classic blacktop":
  • Road Trip USA - Cross-Country Adventures on America's Two-Lane Highways, Jensen.


Road Trip Software
We use Microsoft "Streets and Trips" PC based planning software a 2013 version. MS discontinued this program but there are other approaches. We also use "Allstays" android app and google maps when trekking. The onboard GPS keeps us from making serious mistakes, but one has to check those routes. The "TomTom" I call "DumbDumb" and the Verizon VZ Navigator on the android smart phone provides real time traffic and incident updates.

"Streets and Trip" PC screen, a segment of a recent trek 

When we tire of the 48 States
After the lower 48, there is always Canada and Alaska to visit. We aren't sufficiently adventurous to consider Mexico and South America. But that might change.

Retiring Early - an Escape?
There are many posts and blogs about "retiring early" and travelling, or working while travelling. I'm not here to promote early retirement. It might not be useful to see "retiring early" as a means to escape from a life of work. Doing so may put into play some serious obstacles to financial well being in retirement. Planning a normal retirement at age 65 implies working to the age of 65 and then living in retirement for 30 years. I had great difficulty planning a normal working life of 40 years. There were a lot of detours along the way. That's one of the reasons I worked 52 full time years, delayed retirement and then continued working part time in "retirement".  By doing so I will spend fewer years in retirement. For anyone who has difficulty planning for a month, much less a year, planning for 30 years in retirement seems oddly irresponsible. I can deal with 20 years or so.

Prudence dictates that we consider that retirement may be even more challenging than normal work life. In retirement there are the realities of living on retirement income and dealing with failing health. My golden years may prove to be golden only for the health care and insurance industries.

This post will review a few approaches and will indicate what worked for me. Your experiences will probably be different. However, there are some fundamental similarities.

I suggest that we each:
  1. Find our purpose in life and make money doing that. This may extend our working years.
  2. Save a lot of that money for retirement while working and honoring our other financial obligations.
  3. Continue working beyond social security "full retirement age". 
  4. Once at "full retirement age" move into "phased" retirement which is cutting back on work hours each year while continueing to save.
  5. Trek while in phased retirement. 
  6. Do what we can to balance work and recreation. 
  7. Consider volunteering. 
I have done all of the above, and continue to do so to this day. This blog is my journal about some of my discoveries about trekking since 2013, when I reached a formal retirement age, but continued to work, and I do continue to work (earn some income) even as of the date of this post. However, I don't earn from posts, blogs, ads, etc. I actually do perform other "work" which includes creative writing elsewhere and some very technical industrial engineering. 

Note:
  1. My apologies to author M. Scott Peck, who is the author of a famous book by that name. I have a copy of the 1978 publication. Peck's book begins with "Life is Difficult."    For more information about Peck and this remarkable book go to:


Saturday, September 30, 2017

AGM Batteries, Separator Operation, Charging and Voltmeter

Replacement Battery Separator


Bookmark and Share


December 2019:
I installed a replacement battery separator and it works differently from the old one. See Note 5 in the Battery Separator section, below.

September 26, 2019:
After I installed the digital voltmeter I was able to more closely monitor the coach battery voltage as well as the operation of the separator. Earlier this year I purchased a replacement separator as a "spare".  The old separator seems to work inconsistently or intermittently. For example with the engine running and a 14V chassis battery voltage the separator will connect the chassis and coach batteries. But sometimes it does not!  Go figure. I've decided to install the spare and I'll provide an update after I do.

October 6:  I added information on "clicking" battery separators. This has been reported by owners.
To go to the section on the battery separator, click here: Click here to go to the post section about the battery separator.

June 26, 2019 added the SOC table for the AGM batteries in my 210P. Note, I replaced those batteries and the table for your batteries may differ.

July 3, 2019 clarified separator main and aux connections.
================================================

Read the notes at the end before proceeding! This post is not a recommendation that owners perform their own electrical service. Working with electricity can be dangerous and can result in personal injury, or death or damage to your Roadtrek. 
Sorry if I created a scare, but one does have to be careful if tinkering with electrical systems. Mistakes can be very costly, or can result in personal injury.


My 2013 Roadtrek 210P has:
  • 2 x 6 volt AGM coach batteries, about 220Ah
  • Tripplite 750W Charger/inverter
  • Battery Separator (bidirectional)
  • LED 12V display (four round indicators)
  • Digital 12V display (added by me)
  • Onan generator (2800 watt)
  • 50 watt solar panel, for charging the coach batteries (added by me)
2013 Roadtrek 210P display/switch panel
This is the display/switch panel on my 210P. In the photo the Onan generator is running and supplying 120VAC power. The Battery Disconnect is ON and this is indicated by the Battery On blue indicator. As a consequence the batteries are charging:

Charging the coach batteries
It is possible to charge the coach batteries:
  • While on 120V "shore power"  and using the Tripplite
  • While running the vehicle engine (see the Battery Separator section for limitations)
  • By running the Onan generator and using the Tripplite.
  • On solar
The limitations of the battery LED indicator
The LED indicator of the Roadtrek is a voltmeter which is somewhat limited. It indicates these battery conditions while the soft BATT button is pressed:
  • L - Low
  • F- Fair
  • G- Good
  • C- Charging
Note that the "C" indicator may be on even when the battery is discharging. This may occur shortly after disconnecting the coach from AC or stopping the vehicle engine. The reason is because the coach battery voltage is higher than normal 100% charge. This is what is called a battery "surface charge" and after a few minutes with a small DC load such as the slowly running roof fan, this charge will be dissipated and the true condition of the battery will be indicated. 

In the photo the Battery Disconnect switch BATT is ON as indicated by the illuminated "Battery ON" light. Pressing the Battery button displays the battery situation. The highest (rightmost) illuminated indicator displays the condition, which in the photo is a C for Charging:


Using a Voltmeter to Monitor the Battery Voltage
Monitoring the coach battery voltage is helpful for determining battery capacity. We may want to know how much energy is available in our coach batteries. A voltmeter is useful for doing this.

My Roadtrek didn't have a voltmeter, and the power/switch/display area isn't set up for one. However, there is a 12V "cigarette lighter" style receptacle in the rear overhead compartment, above the DVD player. Unplugging my powered antenna allows me to plug in a voltmeter to check the battery voltage:

12V receptacle

Here's a typical digital plug-in voltmeter. These can be purchased for as little as $7:

Plug-in Digital Voltmeter
What does that voltmeter display mean?
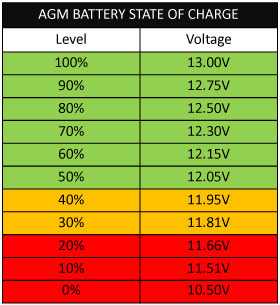
Here's a typical chart for AGM batteries. If we are aware of the voltage at the batteries, we have a rough idea of the "capacity" remaining. For example, if your voltmeter displays 12.50 volts, then you have used about 20% of the capacity or available energy in your batteries. However, I must note that it is not recommended to fully discharge batteries to 0%. That will ruin them.

You will have to decide how low you want to run your batteries. For longest life under moderate temperatures (77F is ideal) some recommend not dropping below 50%, or  about 12.05V.  Dropping to 20% (80% discharge) reduces battery life, but provides energy for a longer time. That's discharging to about 11.66V. Going lower will severely reduce battery life. Fully discharging AGM batteries can damage and ruin them. What does repeatedly discharge below 20% mean? It means severely reducing battery capacity, to the point the batteries cannot provide energy when disconnected from the Tripplite charger (when charging the battery).

Note that you might have poor batteries and be unaware. The 750W Tripplite inverter/charger can provide up to 45A (amperes) of charging current when on shore power. That's about 540 Watts. The Tripplite can not only charge batteries, but also power 12V DC appliances including lights, fan, propane furnace and so on when the Roadtrek is connected to shore power, even with poor batteries.

Having a voltmeter helps to determine just how long your batteries can support your RV when you are disconnected from AC power. For example, suppose you are running your fan, there are interior lights on, the occasional water pump, and your 3-way refrigerator is on propane (some 12V is used). After three hours the voltmeter indicates 12.5V. That means it took 3 hours to use about 20% of your battery capacity. Another 3 hours will use an additional 20% or more. That implies you'll have enough battery power to make it through the night (lights off, pump off and fan on).

This table is typical. Your AGM batteries may vary somewhat.
Typical AGM Battery Table
I replaced my AGM batteries and this is the SOC table provided by the manufacturer.  Your batteries may differ:


What does "reducing battery life" really mean?
AGM and gel lead-acid batteries are chemical devices. They generate electricity using lead plates or mats and an acid liquid. As we repeatedly discharge these batteries, certain deposits form inside them that reduces the capacity. Capacity is the ability to deliver full current for a certain amount of time before the voltage decreases below a useable level. As batteries age, that ability diminishes. For example, a new, fully charged battery can provide a specific amount of current for a specific length of time. Think of this as ability to run your fan, lights, DC for a propane refrigerator and a laptop. With new batteries, you might be able to do that all night. As the batteries age, the length of time decreases and you will find the batteries can no longer do so. And the lights will go out before dawn, whereas before they could be left on all night.

Alternative Voltmeter
I decided to add a digital voltmeter/ammeter. The advantage is I can monitor the amount of current being used and the digital meter provides me with a better idea of the "state of charge" and how much electrical energy might be available. The higher the current, the faster I will drain the batteries. The meter includes a Watt hour counter ("energy"), so I can roughly monitor how much energy is used overnight, should I choose to do so. The meter includes both high and low voltage alarms. This is detailed in another post:


The following data is according to the Tripplite 932768 manual for  750 Watt "PowerVerter DC-to-AC Inverter/Chargers", the Tripplite data sheet and a Roadtrek Manual

Charging the AGM batteries
The batteries can be charged from 120VAC. This is either via shore power or by running my Onan generator. One thing to keep in mind is to turn ON the battery disconnect switch before plugging the RV into AC power or starting the Onan generator. That is per Roadtrek recommendations for my RV.

How long can it take? If the batteries are depleted, it can take 12 hours or longer to fully charge the batteries.

Are there circumstances under which I can't charge the batteries? If  the battery voltage decreases to below 10.0V (+/- 3%, or somewhere between 9.7 and 10.3 volts) a low voltage cutoff will occur. The Tripplite inverter/charger will not charge the batteries if the battery terminal voltages fall that low.   If your vehicle engine is running, the battery may be charged via the standard alternator, if the battery separator allows (see the Battery Separator comments below). A underhood battery separator isolates the chassis battery from the coach batteries when the engine is not running.  However, batteries below 10.5 volts should be checked. They could be damaged.

How can I determine the state of charge? The Tripplite charger/inverter includes a display. However, it cannot be viewed without removing a cover.  Here is a photo with the cover removed. The Tripplite has two rows of LED indicators. One blinks green when on 120VAC and the Inverter switch is "OFF". Otherwise if on 120VAC and the Inverter switch is "ON" then it will be steady green. The switch is located on the Roadtrek display/switch panel near the side entry door. (see the first photo in this post, above).

The other Tripplite indicator goes from off to red to yellow to green depending upon the state of charge of the coach batteries. If charged more than 91% and on AC, one will be blinking green (on AC and inverter off) and the other will be steady green (91% or better charge).

The Tripplite is located in an interior compartment to the left and in front of the powered sofa when you are facing the rear of the RT. The Trippite has a fan and at times you will hear it running. However, there are exposed connectors/wiring so you do need to be careful. If you have any concerns, get a pro to do this.  DO NOT TOUCH ANYTHING.  After you have a pro demonstrate this to you, you can decide if you want to do it yourself in the future.

To reveal the Tripplite, lift up on the top wooden cover at the front and then slide it forward.

Tripplite and DC Electrical Compartment
The next photo is a close-up of the indicators on the Tripplite. The arrow points to a flashing green LED. That means the Tripplite is on AC with inverter OFF. The other indicator which is below the blue cable is the charging indicator. In the photo the bottom LED is green which according to the Tripplite manual indicates "battery capacity charging/discharging 91% - Full"

Here's the table from the Tripplite manual. There are a number of switches for configuring the Tripplite. These LEDs function with Switch in "AUTO/REMOTE" or “Charge  Only” Position. That is how my Roadtrek was delivered.

Approximate Battery Charge Level while charging and discharging (bottom indicator in the photo below):
  • Green = 91% to Full Capacity (see the Tip below)
  • Green and Yellow = 81%-90%
  • Yellow = 61%-80%
  • Yellow and Red = 41%-60%
  • Red = 21% to 40%
  • All three LEDs off = 1% to 20%
  • Flashing Red = 0% (Inverter shutdown)
Tip: How can we determine the Battery Charge Level above 91%?  At about 91% the AC power of the Tripplite is about 10 amperes. At about 100% charge it will decrease to 2 to 4 amperes, assuming the inverter function is OFF. Monitoring the AC current consumption of the Tripplite can aid us in determining the battery charge level above 91%. I have a Progressive Industries EMS on my 210P and I can monitor the AC current consumption. If you have a similar arrangement, so can you. However, you do have to avoid running anything else in the coach to get a reliable reading from the AC draw of the coach.

Tripplite Fault Conditions (bottom indicator in the photo below):
  • All three flashing slowly (1/2 second on, 1/2 second off) = Excessive discharge (inverter shutdown)
  • All three flashing quickly (1/4 second on, 1/4 second off) = Overcharge (Charger shutdown)
The arrow in the photo points to the 120v power "Line green LED":
  • Steady Green = Roadtrek inverter switch "ON" and the coach is on AC power (shore power or Onan generator)
  • Flashing Green = Roadtrek inverter switch "OFF"
  • Yellow = Roadtrek inverter switch "ON" and Coach battery providing power to 120V receptacles via the inverter.
  • Red = Roadtrek inverter switch "ON" and power demanded of the inverter exceeds 100% load capacity

Tripplite LED Indicators
Tripplite Operation and Inverter Selector
The Tripplite has a 3-way slide switch for selecting the "Operating Mode". See the photo below:

Left Position - Auto/Remote
Center Position - DC OFF
Right Position - Charge Only

The "Auto Remote" position ensures that the connected equipment receives constant, uninterrupted AC power. It also permits the Inverter/Charger to be remotely monitored and controlled (in my 210P the Roadtrek inverter switch turns on and off the "inverter" operation if the Tripp-Lite slide switch is in this position).

The "DC OFF" position de-energizes the unit and connects AC OUT to AC IN. In my 210P this slide switch position disables the Roadtrek inverter selector.

The "CHARGE ONLY" setting allows the Tripplite to charge the batteries faster by turning off the inverter, which halts battery discharging.

Operation Switch in DC OFF position

Battery Separator.

Battery Separator - Bidirectional
The battery separator is under the vehicle hood. It controls the connection of the vehicle battery and the coach batteries. In my 210P the battery separator is a "bidirectional" 200A module with a relay for 12V systems. You may have a "unidirectional" model and if so, your battery separator operates differently than the following; for a unidirectional separator see the description in the next section.

The [bidirectional] separator monitors the engine ("Main") and coach ("Aux") batteries. The manual states "If either battery bank is above the connect threshold [13.2V], the relay [closes and] connects the two banks together. If either battery is below the disconnect threshold [12.8V] the unit will open the relay." However, once connected both batteries are at the same voltage. Opening the relay disconnects the engine and coach batteries, preventing the draining of both.  "The connect threshold is set to a nominal voltage of 13.2V, which would only be reached when the charging system is operating. The disconnect voltage is set to a nominal 12.8V, which is near the full charge resting voltage of the batteries. " 

I've monitored the separator and it seems to be intermittent. At times, if the coach battery voltage is less than 12.8V the engine battery will not charge the coach batteries because the separator disconnects if either battery bank is below that voltage. When this occurs, the battery must be charged via 120VAC (shore power or Onan generator). Or via solar. In other words, the battery separator in my Roadtrek doesn't seem to consistently connect my vehicle alternator to the coach battery if the engine battery is 14V and the coach battery is less than 12.8V. That's a coach battery that is 90% charged. See note 7.

According to the separator manufacturer:  The connect threshold is set to a nominal voltage of 13.2V, which would only be reached when the charging system is operating. This will cause the relay to close and the charging system can charge both banks of batteries. The disconnect voltage is set to a nominal 12.8V, which is near the full charge resting voltage of the batteries. This will cause the relay to be opened shortly after the engine is stopped, attempting to preserve 100% of the starting battery capacity for engine cranking."

Note 1: In my Roadtrek the terminal labelled "Aux" is connected to the coach batteries. The terminal labelled "Main" is connected to the chassis battery:

Note 2: The vehicle alternator (Main)  will connect to the coach batteries (Aux) if either the vehicle or coach batteries are above the "connect" threshold of about 13.2V, which is 100% charge. After connecting the batteries will remain connected unless one of the batteries falls below 12.8V. This was confirmed with a new battery separator. See Note 5.

Note 3 :  The separator includes a momentary "auxiliary start function".  The start terminal must see at least 3V* to activate. The auxiliary [coach] battery must read at least 10V*." "This is the input for engine start signal override. When power is applied to this input, the relay will close if the Aux. Battery [coach] is no less than 0.85 Volts below the Main battery [chassis]."  In my Roadtrek this is not used.

Note 4:  According to the separator manufacturer, "* = Typical voltage settings have a +/- 2% tolerance".

Note 5:  Update December 2019. I replaced the battery separator and the operation of the new one is different than the old one.  If either the coach or engine battery is above the "connect" voltage threshold of about 13.2 volts  then the separator connects both coach and engine batteries.  I've monitored this for several weeks and the operation is consistent. If the engine is running the engine battery voltage is about 14.0 volts and the separator connects the engine battery to the chassis battery. If the engine is not running and I connect the Roadtrek to shore power, the Tripplite charge voltage rises to above 13.4 V and the chassis batteries and Tripplite are connected to the engine battery. This is not the way the old separator operated and I can only assume that the old separator had a flaw or failure.

Separator Options
The separator includes some options, including a "start signal" but that is not wired on my Roadtrek. The "start signal input" is the input for engine start signal override. When power is applied to this input, the relay will close if the Aux. [coach] Battery is no less than 0.85 Volts below the Main [chassis] battery.


Where is the Separator located?
The battery separator is the device in the center of this photo with the two red rubber boots. In my Roadtrek the terminal on the right is labelled "Aux" and is connected to the coach batteries. The terminal on the left is labelled "Main" and is connected to the chassis battery:


Alternate Battery Separator - "Unidirectional" Type
The battery separator is under the vehicle hood, see the photo above. It controls the connection between the vehicle battery and the coach batteries. In my 210P the battery separator is a "bidirectional" 200A module with a relay for 12V systems.  The following is the description of a "unidirectional" model. These two models operate differently. You need to determine which you have in your RV.

The unidirectional separator is a 200A battery separator modules with an integrated relay for 12V systems. The separator monitors the engine and coach batteries. If the Main battery is above the connect threshold, the relay connects the two battery banks together. If the Main battery is below the disconnect threshold the separator will open the relay. You will have to determine which battery bank, Chassis or Coach is connected to the "Main" terminal.

The connect threshold is set to a nominal voltage of 13.2V, which would only be reached when the vehicle charging system is operating. This will cause the relay to close and the engine charging system can charge both the engine and coach batteries. The disconnect voltage is set to a nominal 12.8V, which is near the full charge resting voltage of the batteries. This will cause the relay to be opened shortly after the engine is stopped, attempting to preserve 100% of the starting battery capacity for engine cranking.

Battery Separator - Bidirectional - "Clicking"
The battery separator is under the vehicle hood, see the photo above.  From time to time, you might hear a "clicking" sound if your hood is open. That could be the relay of the separator opening or closing.

For a bidirectional separator the relay will close as noted above if the vehicle battery/alternator is above 13.2V and the coach batteries are above 12.8V. Or vice-versa. If either of these falls below 12.8V the relay will open. When the relay closes it connects the vehicle battery/alternator to the coach batteries and when it opens it disconnects or separates these batteries.

The bidirectional will connect the vehicle and coach battery systems if the coach rises about 13.2V and the vehicle is above 12.8V.

At rest, my vehicle battery is about 12.6V. Fully charged my coach batteries are about 13.2 volts after dissipating the "surface charge".

If one has a solar charging system for the coach batteries, it would be possible for intermittent connection of the two systems if the solar system rises above 13.2V and the engine battery is above 12.8V.  Depending upon load and sunlight conditions, if the coach battery falls below 12.8V or about 90%, then the separator relay will open, disconnecting the vehicle and coach batteries. If the sun comes out, or solar improves and the coach battery terminal voltage increases to above 13.2V (which will happen while charging) then the separator relay will close, connecting the two battery systems.  As the coach battery discharges, the terminal voltage will decrease. When sunlight increases, then the separator will again close the relay, "click" and the two battery systems will be connected.

Of course, a faulty separator may also close the relay at unexpected moments.

Solar.

Solar:
In 2014 I  added a 50-watt solar panel and a desulfating solar controller.  Using a 50-watt solar panel provides a maximum 4.17 amperes of charging current at 12V during peak sunlight conditions. That's more than sufficient for maintaining or topping off the batteries.


Notes:
  1. This post is not a recommendation that owners perform their own electrical service. Working with electricity can be dangerous and can result in personal injury, or death or damage to your Roadtrek. 
  2. This information is provided "As Is" and no warranty or claim of accuracy is given. Your Roadtrek and its equipment may be very different than what is portrayed here. 
  3. Refer to the Roadtrek owners manual and the Tripplite Owner's Manual for complete information. 
  4. The Tripplite inverter/charge includes 120V surge protection. In other words, outlets that are powered by the "invert" mode will have surge protection. Any others in the coach will not have any surge protection unless it is added. In my case, I have an electrical management system (EMS) on the shore power line. I don't have such a thing on the generator power output. 
  5. For troubleshooting of the Tripplite, refer to the owners manual. 
  6. This post is based on several other posts in this blog as well as recent social media posts by me. I'm providing this so I won't have to write this up again. 
  7. My coach batteries exhibited difficulty at about 3 years. I suspect the problem was the model battery separator Roadtrek installed in my 210P. The separator won't connect the vehicle alternator to the coach batteries unless the coach batteries are at 100% charge. 
  8. All info on the battery separator is per the manufacturer's data sheet.