7 Pages are shown on the Main Page.

7 pages are shown on the Main Page. To see additional posts, click on the link "Older Posts" at the bottom of the main page. For videos go to https://www.youtube.com/@normanretzke4377/videos click "skip" to avoid ads


G has a "swell" time kayaking

G has a "swell" time kayaking
G has a "swell" time on Lake Michigan in an inflatable canoe

Dawn on the Gulf of Mexico

Dawn on the Gulf of Mexico

Warren Dunes Sunset

Warren Dunes Sunset
Warren Dunes Sunset

Friday, May 14, 2021

Summer Travel Check List


On the Florida Panhandle

Bookmark and Share


Once a year, usually the Spring, I check the condition of the Roadtrek components prior to our first trek.  This year our first trek will be about 2,000 miles. 

I use a list. This is for preparing the Roadtrek 210P when no below freezing weather is anticipated. If freezing weather is a possibility I will either 1) Travel with the water system winterized or, 2) Carry a couple of gallons of pink anti-freeze so if we encounter freezing weather I can winterize while travelling.  We carry several gallon containers of fresh water inside the Roadtrek. We use for drinking, coffee, etc. and replenish on the road.

This list may not be all inclusive.

2012 Chevrolet 3500 Chassis (2013 model year 210P)
  1. My vehicle chassis is well-maintained and has about 45,000 miles. It was last at the Chevy dealer about 2,000 miles ago. It has new tires, brakes are good, etc.  
  2. Check engine oil level and life remaining (life is currently 72% at about 45,400 miles). I change if more than 9 months old or less than 25% life remaining.
  3. Check battery fluid level and electrical terminals.
  4. Inspect tires, check pressures.
  5. Check the operation of the EZ-Lift and check the spare tire.
  6. Check Chassis door latches and electric door locks.
  7. Check the GPS, radio, vehicle heat and air conditioner, etc. 
  8. Do a test drive at speeds up to 70 MPH (legal limit permitting). 
  9. Fill the gas tank.
  10. Check the wiper blades, and fluid level. Run the wipers and wiper pump. 
  11. Check headlights operation and turn signals.
  12. Check mirror controls.
  13. Check the front seat controls. 
Roadtrek Body and Interior Drawers/Doors
  1. Extend the awning.
  2. Check exterior drawer slides and lubricate.
  3. Check exterior door and compartment locks.
  4. Check keepers for flip-up exterior cabinet doors.
  5. Check keeper straps at rear and front fiberglass effect bumpers.
  6. Slide underneath and check for loose, dangling stuff.
  7. Open and close all windows to confirm proper operation.
  8. Check interior cabinet latches. Open and close all interior doors and drawers.
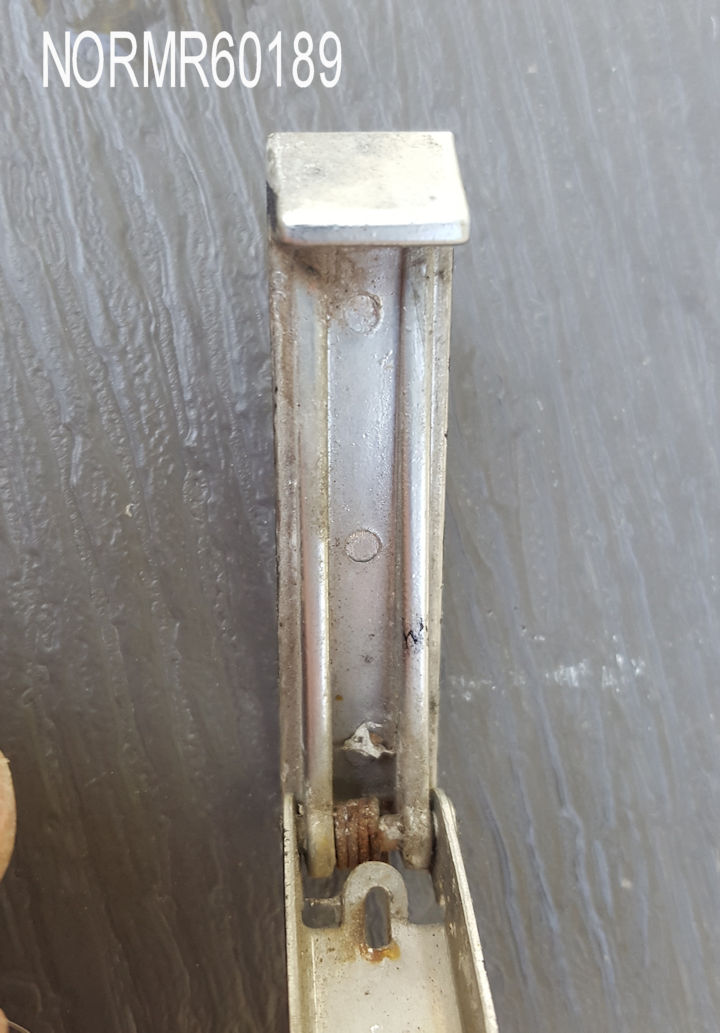
Exterior Door Keeper - Rusted and broken Spring


Roadtrek Electrical Systems
  1. Turn on the battery disconnect for the coach. 
  2. Connect the Roadtrek to 120VAC power. 
  3. Charge the AGM coach batteries (otherwise maintenance free).
  4. Check the 120VAC power protection device (Progressive Industries).
  5. Check for 120VAC at all receptacles. Test the GFI function.
  6. Turn on all lights, the vent fans in the bathroom and coach.
  7. Check the operation of the exterior patio light.
  8. Check the indicator on the propane leak detector.
  9. Check the battery and the age stamp of the fire alarm. Replace the battery. If the detector has expired replace it.
  10. Test the refrigerator for proper operation on AC and DC. 
  11. Check the TV and entertainment systems.
  12. Check the convection-microwave oven operation.
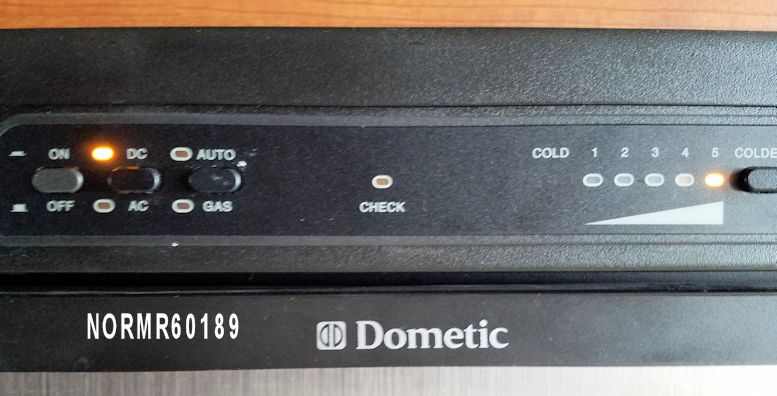
  13. Check the Tripplite Inverter-Charger indicator LEDS. Confirm proper charging of battery per the illuminated LEDs.
  14. With Coach disconnected from shore power and running on AGM batteries, turn on the Tripplite inverter, check the status LED and confirm AC is present at the designated outlets.
  15. Check the operation of the  12V chassis-coach Battery Separator. 
  16. Check the back-up camera for proper operation.
  17. Check the electric couch worm gear and run the couch up and down.
Tripplite Charge Status Indicator


Coach Water Systems
  1. Drain pink anti-freeze from the interior and exterior tanks.
  2. Remove the filter from the DC water pump and clean. Reinstall the filter.
  3. Move all interior valves including those in the pump compartment. 
  4. Verify sink and exterior valves are closed. 
  5. Check the condition of the hot water heater anode. Replace if necessary.
  6. Add 1/4 cup bleach to a gallon of fresh water, put in the fresh water tanks.
  7. Close the hot water heater bypass valve and open the inlet and outlet water valves.
  8. Connect the Roadtek to a fresh water source.
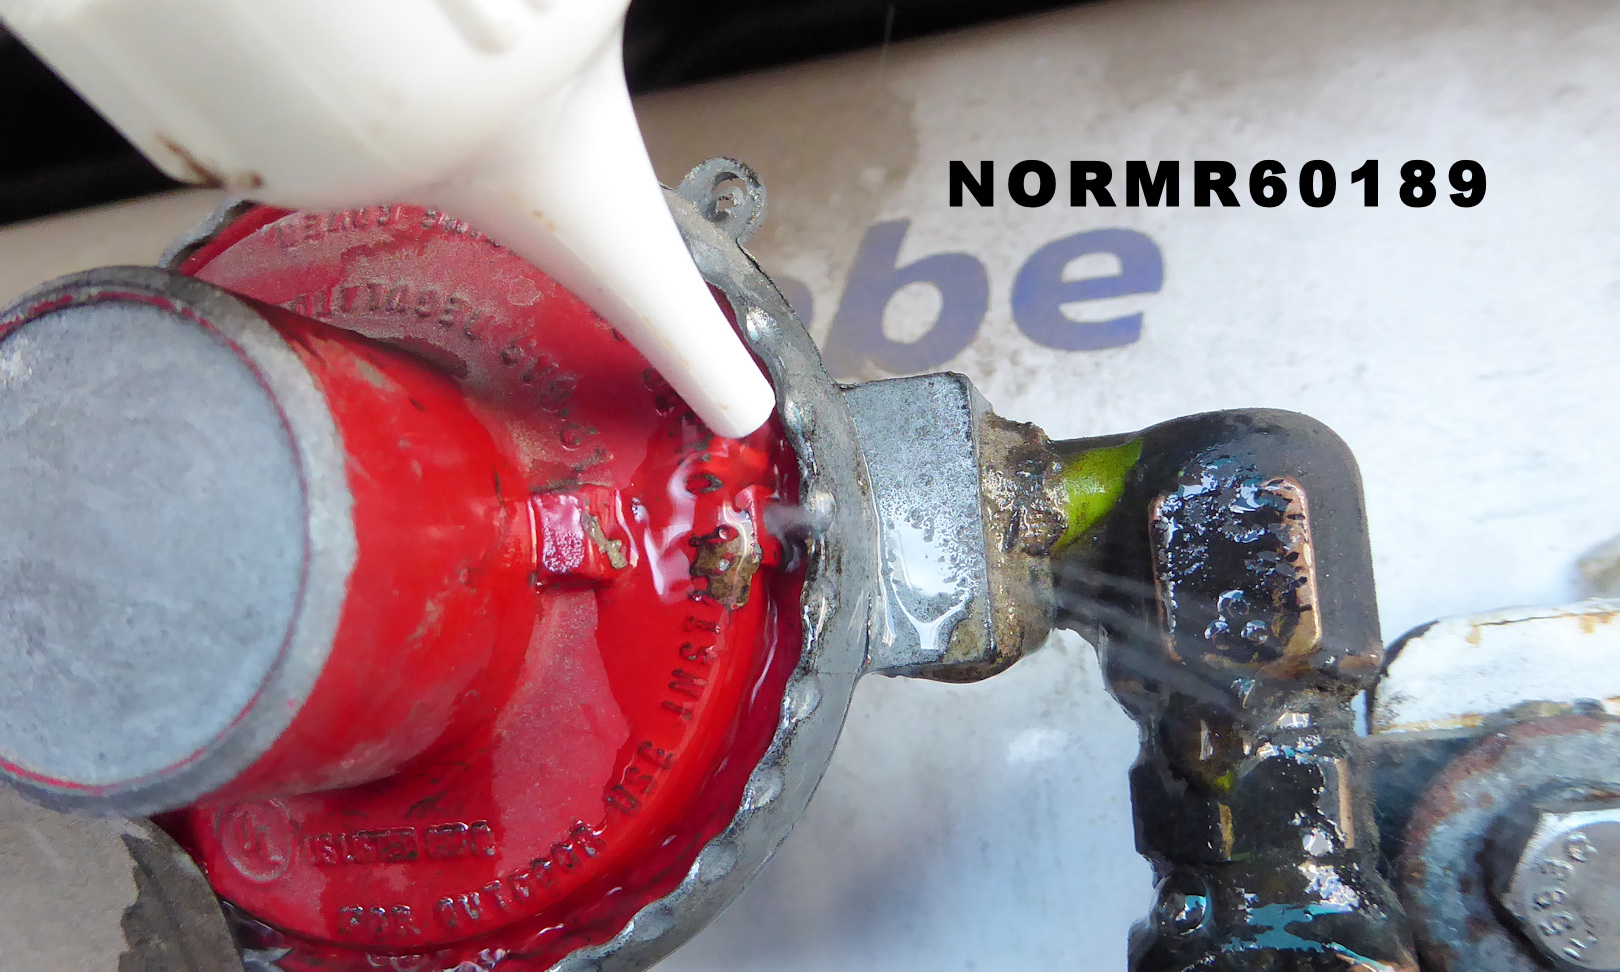
  9. Test the exterior pressure regulator. 
  10. Flush the system with fresh water, run water into the sinks and through the hot and cold water lines (don't forger the exterior shower).
  11. Test all fresh water valves.
  12. Flush the toilet.
  13. Look everywhere inside and outside for any leaks. Open all cabinets that contain water piping or components and inspect for any presence of water.
  14. Fill the exterior tank with fresh water (fill of the interior tank is optional).
  15. Check the LED fill indicator. It should indicate a full tank.
  16. Fill the hot water heater with fresh water (leave a hot water sink valve open to allow trapped air to escape, or open the hot water heater pressure relief valve).
  17. Fill the exterior fresh water tank with fresh water. 
  18. Run water from all hot and cold water valves at the sinks.
  19. Run the water pump and confirm that it pumps and shuts off when the system pressurizes. 
  20. Confirm I have a new fresh water filter.
  21. Test the exterior water pressure regulator.
  22.  Confirm I have packed the fill hoses. in the RT. 


Pressure Regulator


Depleted and New Anode for Suburban Hot Water Heater


Coach Gray and Black Systems
  1. Flush the toilet and check the tank fill indicator.
  2. Run the sinks and check the tank fill indicator.
  3. Run the macerator and verify that it does empty the gray and black tanks.
  4. Check for hose leaks. 
Gray Tank Level Indicator


Coach Propane System
  1. Check the propane tank level. 
  2. Open the propane tank valve. Listen for hissing or other unusual sounds. If I smell propane immediately close the valve and determine the source of the leak.
  3. Light a range top burner to confirm propane is flowing and available.
  4. Turn on the hot water heater. Confirm the burner ignites.
  5. Allow the water to heat, the water heater should automatically shut down when it reaches temperature. Run hot water and confirm the temperature. It should be hot, not warm.
  6. Run the refrigerator on propane mode and confirm proper operation.
  7. Close the propane tank valve.
  8. Fill the propane tank prior to travel.
Testing the propane range top

Onan Gasoline Generator
  1. Check oil level.
  2. Replace oil and air filter at manufacturer's recommended interval.
  3. If extreme weather is anticipated confirm the the generator has the proper viscosity oil.
  4. With Roadtrek coach only on battery start the generator and run an hour per manufacturer's recommendation. (Should be run monthly for one hour).
Generator Oil Fill and Level Indicator (See the Onan Manual)


Cool-Cat Heat Pump
  1. Clean the interior air filter.
  2. Check the exterior area for birds!
  3. Run the AC and confirm proper operation and cooling,
Cool-Cat Interior Filter - After Cleaning

Anything Else?
Well, now I can clean everything.   I wipe down the interior of the refrigerator with Clorox wipes, check the condition of bug screens on the side window and rear of the coach, check the condition of the bug screens I added to the interior of the exterior refrigerator vent panels and the hot water heater. I check or replace the batteries in the TV remote, the temperature monitors, the fan for the interior of the refrigerator. Etc, etc. etc.

Original material http://roadtrek210.blogspot.com/


Monday, May 10, 2021

Tucson trek via South Dakota - Option 3


Trek Route - Click on Image to Enlarge


Bookmark and Share

We are planning our trek from Southwest Arizona to our Michigan campsite.  We are looking at several routes that would take us through South Dakota. Some of the activities we would like to do won't be possible because not all of the amenities will be open in May 2021.

The map above is one option.  We would stop nearby:

  • Elephant Butte, NM
  • Raton, NM
  • Ogallala, NE
  • Pierre, SD
  • Winona, MN
  • DuPage County, IL

Original material http://roadtrek210.blogspot.com/


Thursday, May 6, 2021

Propane Problem Resolved - Regulator Leak

Rear bumper removed to gain access to the propane system


Bookmark and Share

I opened the propane tank shut-off valve and I could hear a "hiss" when kneeling at the shutoff-valve.  This indicated a nearby leak in the system.  Climbing  under the Roadtrek I could barely see the regulators, but could not reach in or determine the source of the leak.  In fact, I used a dentist's mirror to see the regulators. In 2014 the Roadtrek had a propane issue. We could smell propane when at the rear outside of the vehicle. This was repaired by the dealer "under warranty". However, the corrugated black plastic protective shield was not fully closed. Which was why I could see the regulators while on my back and under the vehicle.

I decided to think about the possible solutions.  Obviously, I needed to get to the regulators. I suspected the accessory regulator diaphragm had failed. But there was nothing to do until I could get access, nor could I locate the specific source of the problem until I could gain access.

I had several choices:
  1. Take it to a dealer.
  2. Do the work myself.
  3. Take it to another repair source and share the work.
I pondered the best approach.  I crawled under the Roadtrek a couple of times and concluded there were two methods to gain access to the propane regulator area:
  1. Remove the tank and propane components.
  2. Remove the rear bumper, thereby exposing the propane components.
The rear bumper of the Roadtred is a fiberglass shell bolted to the original Chevy 3500 steel bumper.  The fiberglass covers the steel bumper which is not visible from the rear.  The Chevy bumper is attached to the chassis with eight bolts.  The fiberglass shell also has two plastic straps attached to the body, acting as stiffeners.

I decided to go to a local repair shop I use in Tucson and discuss the removal of the bumper with them.  I described what I wanted and how the bumper(s) were attached to the Roadtrek frame.  They concluded that they could remove the bumper.  That was the approach I chose.  They would remove the bumper, I would deal with the sourced of the propane issue and then they would re-install the bumper.

The labor cost to remove and re-attach the bumper was $119.43, including Tax.  My material cost was about $10.  It included yellow (natural gas/propane) sealing thread tap, a 1/4 NPT brass cap, 1/4 NPT brass plug (I wasn't  sure which I would need). My material also included Velcro tape to attach the corrugated protective cover over the regulator.

The bumper was removed and the top photo shows it in the garage.

Accessing the Propane Tank and Regulators

The next photo shows the tank and regulators exposed by removal of the rear bumper.  There are two regulators:
  1. Chassis regulator - two stage
  2. Accessory (grill) regulator - single stage, 10 PSI.
I suspected the single stage regulator was the source of the leak. 

As can be seen in the photo, this model Roadtrek (2013 210P) has the regulators installed above the 10,000 lb. hitch frame.  Because the regulators are sandwiched between the bumpers and the propane tank, there is absolutely no access from below with the tank and bumper attached. 

Rear Bumper Removed, exposing Propane tank and Regulators

To check for the source(s) of the leak I made a soapy mixture and sprayed it on the piping and on the weep hole of the 10 PSI regulator.  These regulators have an internal spring-loaded diaphragm. The diaphragm can fail and if it does, propane can leak to the spring side of the regulator and from there to atmosphere via a pressure weep hole.

I sprayed the mixture on the regulator, opened the propane valve slightly and the leak became readily apparent, as can be seen in the photo:

Propane Leak at Regulator Sprays water

Remove or Replace the Regulator?

With the source of the leak identified I had two choices:
  1. Replace the accessory regulator.
  2. Remove the accessory regulator.
Because this was the second problem in this area since 2014 and the fact that I have never used the accessory propane connection I decided to remove the accessory regulator and install a brass plug or cap, as required.

Removing the regulator and capping the propane piping

I removed the regulator and a brass street-elbow and attempted to remove a short fitting but it was really stubborn. I was going to install a plug in the tee, but that wasn't possible. So I decided to install a cap instead of a plug.

Remove the accessory propane hose clamp


Remove the Accessory Regulator and hose

Regulator and hose removed

Brass cap installed with yellow gas sealing tape

I reinstalled the hose clamp using the original screw. That was the easiest method to seal the hole. I then removed a street elbow and installed a 1/4 NPT brass cap using yellow gas sealing tape; that is very important. The proper seal must be installed.  White Teflon tap must not be used. After tightening the cap I opened the propane valve and applied a liberal amount of soapy water to the existing Tee and the new cap.  No leaks were detected. 

Testing the Propane System

To test the system I lit the range top burner.  Success.  I then returned the Roadtrek to the shop so they could wrap the propane dual-stage regulator with the original plastic protective "box" using velcro strapping I provided.  They then re-attached the bumper.
Range top works again on propane


Final Assembly
There were two plastic stiffeners to hold the left and right caps of the fiberglass bumpers. I drilled out the pop-rivets and re-attached. One had been previously damaged. I replaced it with plastic strapping material I got at the hardware store.


Final Step
The next step will be to put fresh water in the tanks and turn on the hot water heater.  That will be tomorrow.

Additional Information - Rusty propane tank
You may notice that the propane tank is white but dirty.  In fact, when I had the first propane issue in 2014 I crawled under the tank and noticed some pits and dings which were rusty.  I assume this was caused by stones and other road debris being tossed up and onto the tank.  I cleaned the tank with a solvent and then applies white Rust-o-leum paint.  The tank still looks good.  I am a firm believer of Preventative Maintenance as a means to minimize breakdowns.

Original material http://roadtrek210.blogspot.com/ (c) 2021


Tuesday, May 4, 2021

Solar and 12V Refrigerator


Partly Cloudy - Rain Expected


Bookmark and Share

We are preparing for a trip and I'm checking the systems of the Roadtrek.  One of the things I test is the 3-way refrigerator (AC-DC-Propane) model RM2554. For the test the refrigerator and freezer are empty. I then place a sensor in the freezer.  

Why empty? I wanted to see the performance of the refrigerator. Had I put frozen stuff in the freezer, the temperature of the freezer would have decreased or increased because of the temperature of the contents. 

I plugged the 210P into shore power and set the refrigerator to AC with a cooling setting of "5". I began this test at 4:30pm.  The freezer gradually reached a low of -15F with the outside temperature at 8am of 56F.

I then switched to DC to see how well the refrigerator can function on that power source. This would be the method used when traveling in the vehicle. According to Dometic "The DC mode is a holding mode not a full cooling mode. DC should be used once the unit is cooled down on gas or AC and driving (constant supply of DC) down the road." 


Refrigerator selected for 12V DC, maximum cooling

I'm curious about the apparent difference when on DC cooling as opposed to AC cooling.  According to Dometic the energy sources, both AC and DC are identical. The DC cartridge heater  supposedly provides the same energy for cooling as the 120VAC cartridge heater provides:

  • 12 VDC cartridge: 175W (30A Fuse)
  • 120VAC cartridge: 175W

12VDC Issue

With the Roadrek running on coach battery power and the refrigerator "OFF" the power meter indicated only 0.11A of DC battery power being consumed. At the time the roof vent fan and interior lights were off.

Battery System Status while on Solar and Overcast

I allowed the refrigerator to chill overnight on 120VAC power.  The freezer temperature gradually reduced to minus 15F.  At 8am I disconnected the Roadtrek from shore power. 


I then switched the refrigerator to 12VDC.  The power meter indicated a problem.  The RT was consuming only 0.41A.  That implies the cartridge heater of the Dometic was not getting 12VDC power. By noon the freezer had warmed to about 33F.

12VDC Battery running the refrigerator

Troubleshooting the Problem

The 12VDC power to the cartridge heater is controlled by a relay. I readily determined that the 12VDC cartridge heater was not hot. Using a DC Voltmeter I checked the 30A fuse.  It was okay. I then determined that the relay coil was getting power. I surmised that the relay had failed.

Existing relay, unscrewed from aluminum mounting

I went online and began looking for a replacement relay. The relay is a standard automotive DC relay, similar to a horn relay.  I didn't have much luck with online Dometic suppliers, who seemed to want to sell me a new circuit board and relay.  I did more research and found a generic supplier. I purchased two relays for about $4 each; I'll keep one as a spare.

I installed the relay and put the refrigerator on DC mode.  I checked the power at the heater and it was getting 12VDC. Success!

Rerunning the Test by chilling on AC Mode and then switching to 12VDC Mode

I followed the Dometic manual and chilled the refrigerator on AC mode. Normally I'd then fill the refrigerator with cold food and then switch to DC while travelling. For this test the refrigerator was empty.

A little morning haze turned to bright sun

On this day we had bright sun. The Roadtrek was parked mostly in the shade. At 4pm with the ambient temperature at 87F and the freezer interior about 80F I  plugged the Roadtrek into 120VAC shore power. I allowed the refrigerator to run overnight on AC and a cooling setting of "5".   It took 2 hours for the freezer to cool to 32F. At 6:00pm the freezer had cooled to 32F. At 7:00pm it had cooled to 20F and at 8:00pm it had cooled to 11F.  At that time the ambient temperature was about 76F.

Nighttime ambient dropped to a low of about 67F at 6am.  

The freezer temperature continued to decrease throughout the night. By 8am the freezer was about minus 10F.  I then selected DC mode on the refrigerator with maximum cooling setting of "5".  I let the refrigerator run on 12VDC from 8am to until 4pm.  At 4pm the freezer temperature was about minus 2F.  I assume the gradual rise in temperature was because of the increasing exterior temperature.  The interior of the Roadtrek was 94F at 4pm. It had been in mostly shade during the day. 

Refrigerator on AC and later on DC power

The Refrigerator was consuming about 3A DC according to the power meter. I have an in-line Ammeter I could use to confirm this.  However, if this is the DC consumption running on my solar system should not be an issue.


The temperature in the vicinity of the 12V cartridge heater was 145F:


General Refrigerator Information

According to the service manual, the refrigerator consumes:

  • 12V Controls: 3 A.(That's the fuse size, too!).
  • 12V Heater: 15A (175W).

Based on my power meter it seems the DC mode requires less Amperes than the manual indicates. That is a possibility. It would explain why Dometic describes the DC mode as a "holding mode".  If the DC cartridge heater was the same watts as the AC cartridge, I would expect the refrigerator to cool identically on DC and AC mode.

According to Dometic the refrigerator will function down to 9.6 VDC.  However, I am curious to see if decreasing battery voltage at night when there is no solar will impact the DC cartridge heater and if there is a lower voltage limit. It is also possible that the DC relay won't function properly at such a low voltage.  Relays of this type have a minimum "pick-up" voltage and also have a "drop-out" voltage. If the DC holding the relay "in" falls below the "drop-out" voltage the relay will de-energize. If this occurs the relay will disconnect the cartridge and the heater will no longer have 12VDC power.

Here's the circuit board in my refrigerator.  The photo indicates the part number. Yours may be different. Both the relay and the 30A DC fuse are mounted externally to the circuit board.


 Original material http://roadtrek210.blogspot.com/


Sunday, May 2, 2021

Enjoying the warm weather


Bookmark and Share

Well, Spring has sprung they say.  Currently in Tucson the daytime highs are in the range 80-90F and the nighttime lows are 50-60F.  I'm in no hurry to move on, and because the snowbirds have moved on, it is really pleasant. 

Here at the resort, the three pools and two hot tubs are a place to be.


The cacti have been blooming for a month, and now with the arrival of warm weather the saguaro cacti are blooming, too.


The central courtyard is a pleasant place to relax.


There are beautiful sunsets, too.


I'm in no hurry to leave.....


Original material http://roadtrek210.blogspot.com/


Saturday, May 1, 2021

12V Refrigerator issue


Temperature of Refrigerator (freezer) on 120VAC 


Bookmark and Share

I'm checking out the systems of the 210P.  The refrigerator has been "OFF" and so prior to a trip I powered up the 3-way Dometic refrigerator.  It worked fine on AC. The sensor I put in the freezer registered minus 15F and then I switched to DC.

As you can see in the graph above, the cooling stopped on DC.  I've done some trouble-shooting and I ordered a part.  After installation I'll try again and post the results.

 Original material http://roadtrek210.blogspot.com/


Saturday, April 3, 2021

Trekking 2021


Bookmark and Share

With the arrival of Spring, winter campers are living our winter resort location.  

We have been discussing our 2021 trekking ideas. I'm in no hurry to leave.  I'll let the snowbirds depart and give them some time to get home.  It does seem that the camping season may be more normal in 2021 than it was in 2020.  However, I suspect there is a lot of "pent up demand" as newbies and those who were locked down in 2020 seek to use their RVs.  I understand a lot of RVs were sold in recent months.

Houseless in 2021

I think we'll be houseless in 2021.  I have no burning interest in being a landlord and I can't move forward until I dispose of the "house" we never live in.  G and I have discussed this at length.  Neither of us are attached to the sticks and bricks.  

This does create a need to determine where to legally domicile. There are a couple of services which can assist us in making a decision.  We are Escapees members and we do use their mail forwarding service. Escapees does provide some data on several states. However, a lack of a permanent. legal address will need to be corrected.

"The only constant is change" is an old expression.  This does apply to US States, which are changing. Some recent possibilities are being over-run by escapees from nearby mis-managed States.  Californians are leaving the paradise they ruined and are moving to Arizona and Texas.  Illinois residents have been escaping for a decade, moving to Indiana and Wisconsin, and now farther to Michigan and Tennessee.  The east cost is migrating to Florida.

Frankly, if I wanted to live in California or New York I would move there. Nor do I want to domicile in a state that the escapees will ruin as they did their home states. As a consequence, Texas and Florida are not as desirable to me as they were only a few years ago. 

To the Plains?  

We have never trekked to South Dakota or visited Yellowstone.  This may be the year, On the other hand, we are concerned about a crush of RVers in 2021.  We have the option of driving to Yellowstone and going elsewhere if we note that the place is over-run. We'll have contingency plans.

A friend in the southeast is wanting to leave Florida and the recent onslaught of New Yorkers for a while. We're discussing linking up in a nearby state.  That is a work in progress.

One of the few states I have not visited is Idaho.  A Idahoan suggested recently "Buy 5 acres on a stream and at least a tank of gas distant from the cities".  I suppose that should also be at least a full charge away for electric cars. LOL.

Back to Michigan

We'll spend a lot of time in MI this summer.  I'm looking forward to kayaking, hiking and bicycling. Also to return to some of our favorite spots.  


 Original material http://roadtrek210.blogspot.com/